fbpx

Eggless Black Forest Cake

Home » Eggless Black Forest Cake

Eggless Black Forest Cake

If there is one cake loved by everyone in this whole wide world and never fails to captivate the hearts of people, it is the legendary Black Forest Cake!

It is more than just a dessert; it is a divine combination of flavors like chocolate, cherry, and vanilla-flavored whipped cream. It is an irresistible symphony of flavors and textures that transport you to a desert paradise!

The black forest cake is also known as “Schwarzwalder Kirschtorte” in German and traces its roots in the Black Forest Region of Germany. It is believed to be inspired by the forest’s abundant cherries and the world-famous Black Forest Kirsch.

Traditionally, this cake is assembled with multiple layers of chocolate cake, cherry filling, and whipped cream.

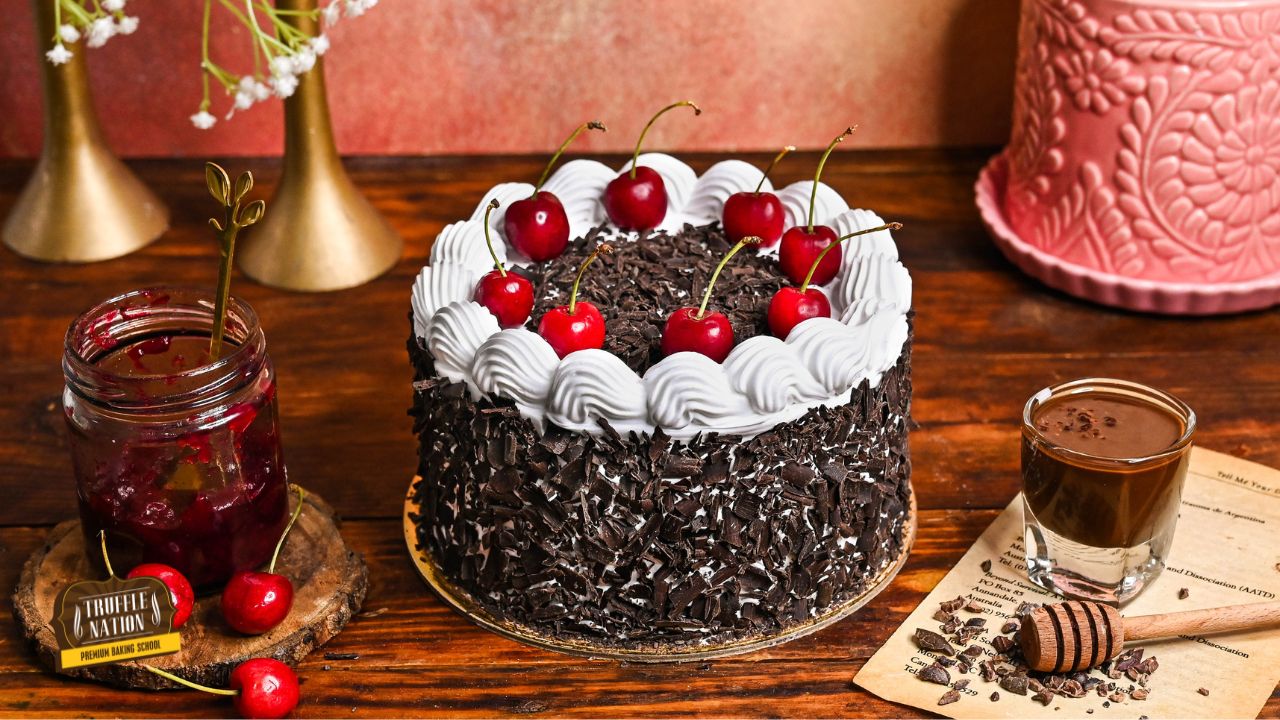
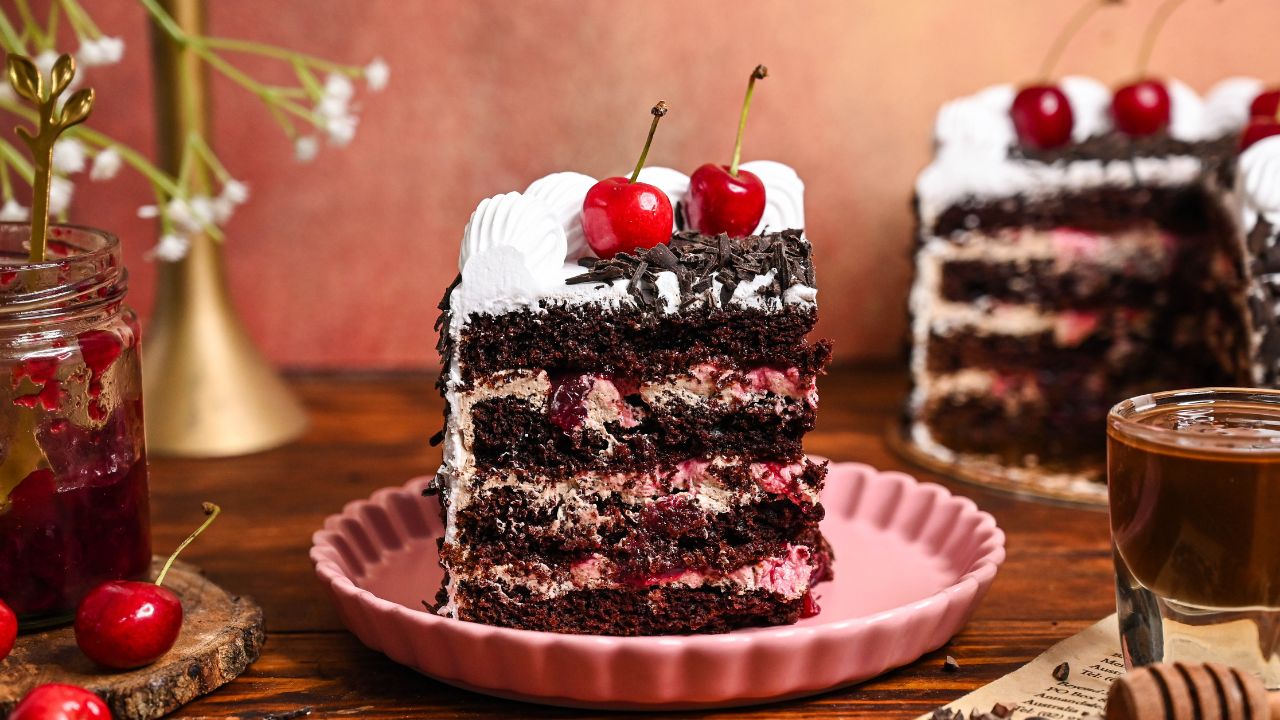
But in this recipe, I have layered the cake with chocolate mousse, soaked it with cherry liquor and water mixture, then added homemade cherry compote in between, frosted with whipped cream, and garnished with chocolate shavings and fresh cherries.

I can guarantee you that after having this cake, you won’t ever return to the old bakery-style black forest cake. And for those always looking for eggless black forest cake, this cake is made for you.

Make this cake for your next birthday or any other occasion, and impress your loved ones. They will surely keep asking for more.

Eggless Black Forest Cake Recipe Video Tutorial

Why You’ll Love This Recipe? 

  • Flavor: It has a delightful chocolatey flavor with the addition of juicy cherries and luscious whipped cream. The chocolate sponge layers are moist and tender, with deep cocoa flavor complemented by the sweetness and tartness of cherry compote. Topping it off with velvety whipped cream and garnished with chocolate shavings, all these combined create an indulgent and refreshing flavor, making it an irresistible dessert for all. 
  • Texture: This cake has a soft, moist, and tender texture. Despite being eggless, the cake has a perfect crumb and structure that offers a delightful experience with each bite. 
  • Easy: Although it takes a little bit of time to make this recipe, it is easy and simple to follow. And the result is so beautiful that you will want to make this cake repeatedly.
  • Crowd pleaser: Whether you are serving it to family, friends, or any guests, this black forest cake is a crowd pleaser that will receive compliments and smiles all around.
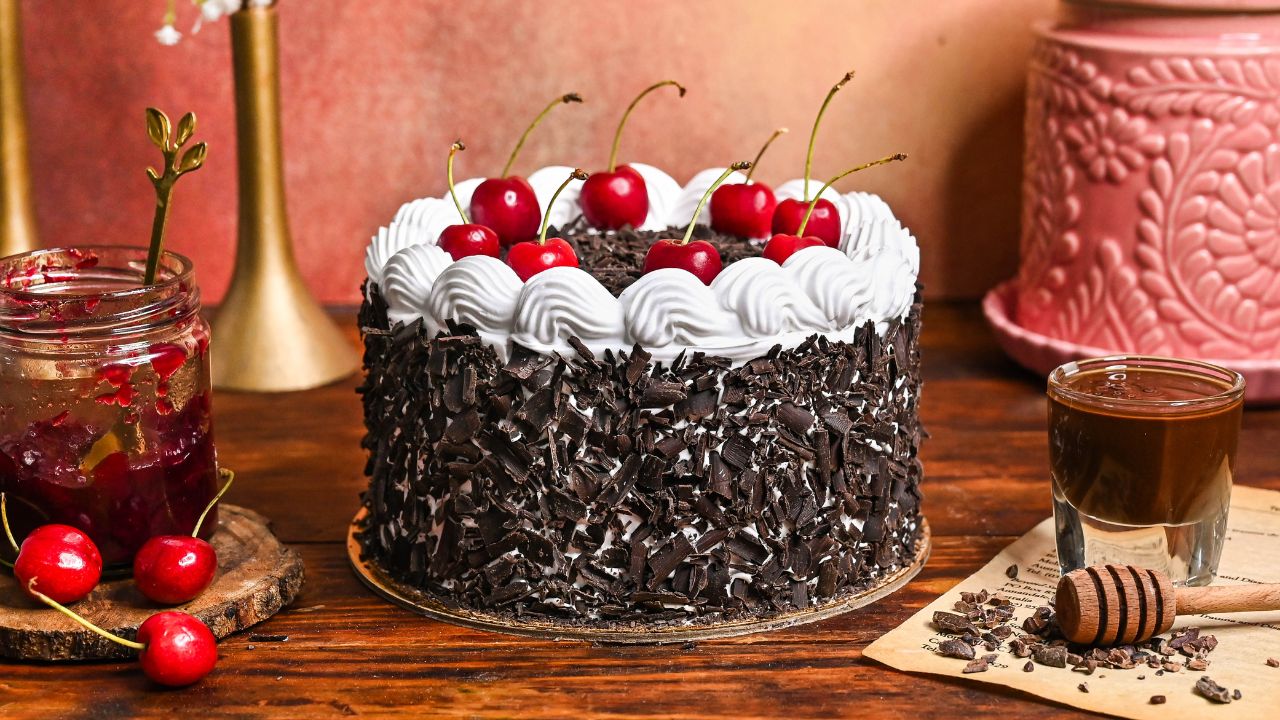
  • Visually appealing: Its elegant appearance with layers of chocolate cake, whipped cream, cherries, and chocolate shavings makes it appealing and inviting. 
  • Classic: Black forest cake has been a beloved cake for generations; no one would not like to taste this amazing cake, making it a classic cake.

Important Ingredients Used in the Recipe

  • Cocoa powder: I have used natural cocoa powder to make the chocolate sponge for the cake. You can use any kind of unsweetened cocoa powder for this recipe, but the color and texture may differ a little.
  • Fat: I have added melted butter and oil to the recipe to give the cake a rich flavor.
  • Cherries: Fresh, sweet cherries have been used to make the compote and to garnish the cake.
  • Chocolate: I have used dark, semi-sweet chocolate to make the mousse filling for the recipe. You can also use milk chocolate if you prefer it.
  • Red wine: Using red wine gives the cake a nice flavor, setting it apart from other black forest cakes. You can use non-alcoholic cherry-flavored juice if you do not have red wine or cherry liquor. 
  • Whipped cream: In this recipe, to frost the cake, I have used sweetened whipping cream that gives the cake a velvety texture.

How to Make Eggless Black Forest Cake

Preparations: Gather all the ingredients that you need to make the cake. If your ingredients are in the fridge, let them come to room temperature completely. Grease two 6-inch round baking tins with oil and place butter paper at the bottom. Preheat the oven to 180°C or 350°F (OTG mode: lower rod + upper rod + fan).

For The Sponge

Sifting: In a big bowl, sift all the dry ingredients, which are all-purpose flour, natural cocoa powder, baking soda, and salt. Sifting dry ingredients is an important step in making the cake. So make sure that you do not skip this step. 

Mixing liquid: In a different bowl, mix all the liquid ingredients, which are milk, water, oil, and melted butter. Add this liquid mixture to the sifted dry ingredients in parts and make a smooth batter out of it.

Baking: Transfer it to the prepared tins equally and bake them at 180°C or 350°F (OTG mode: lower rod mode only) for 30-35 minutes or until the toothpick inserted in the middle comes out clean with a few crumbs.

For Cherry Compote

To make the compote, first deseed the fresh cherries. In a heavy bottom pan, add all the ingredients: deseeded cherries, sugar, lemon juice, lemon zest, and salt. Cook them until all the sugars are dissolved and the cherries soften. Transfer it to a bowl and let it cool down.

For Mousse

For the mousse, in a microwave-safe bowl, melt chocolate and let it cool down. Meanwhile, in a different bowl, beat whipping cream with an electric hand beater until a soft peak is achieved. Now, in this, fold in the melted chocolate with a spatula. Transfer it to a piping bag and keep it aside to assemble the cake. 

For The Soaking Syrup

For the soaking syrup, mix red wine and water.

For Frosting

Beat whipping cream with an electric hand beater until a soft peak is achieved. 

For Chocolate Shavings

For chocolate shavings, start peeling the corners of the chocolate with a vegetable peeler. 

Assembly

Layering: On a cake base, pipe some of the frosting and place a layer of sponge on top.
Soak it with the soaking syrup and pipe the whipped cream frosting on the edge of the layer so that our filling does not spill while layering.
Pipe some dark chocolate mousses in the center and smooth out with an offset spatula to even out.
Add cherry compote on top of the layer and place another sponge layer.
Repeat the same process as with the first layer until we get a cake with four layers.
Soak the top layer as well. 

Crumb coating: To crumb coat the cake, pipe thin layers of frosting all over the cake and smooth it out. It helps in setting the stray crumbs in place. Keep it in the fridge for 15 – 20 minutes until the frosting sets a bit.

Final coating: After 15 – 20 minutes, give the cake its final coating by piping thick layers of frosting all over it and smoothing them out to ensure you get a sharp edge on top. 

Decorating: For decorating the cake, pipe shell borders using an open star or 6B nozzle. Stick chocolate shavings on the sides of the cake as well as the top center of the cake. Lastly, place fresh cherries on top.

Chef’s Tip For The Recipe

Tips For A Neatly Frosted Cake.

If possible, use chilled whipping cream and cold utensils to make the frosting.
Allow the cake layers to completely cool down before layering and frosting, or it may melt the frosting.

Types Of Cherries That Can Be Used For The Cake.

Use pitted fresh cherries to make the compote. But you can also use canned or jarred cherries; maraschino cherries would also be fine for the cake.  

How to Store Eggless Black Forest Cake

You can store the cake in the fridge for 2 – 3 days. Make sure to keep it in an air-tight container so that it does not get dried out.
You can keep it in the freezer for at least one week after placing it in an air-tight container.

More Easy Recipes

Check out our other recipes that are as incredible as this one,

Black Tie Mousse Cake

Blueberry Chocolate Cake

Mango Mousse Cake

Frequently Asked Questions

Can I make the cake alcohol-free?

Although using alcohol in this recipe is traditional, you can use a non-alcohol version by mixing cherry juice and water.

Are chocolate cake and black forest cake the same?

No, both cakes are different in taste. Traditionally black forest cakes are made with layers of chocolate sponges, soaked with cherry liquor and filled with whipped cream and cherry filling, and then frosted with whipped cream and decorated with chocolate shavings. On the other hand, chocolate cake is a cake that has layers of chocolate sponges filled with chocolate frosting. You can transform a simple chocolate cake into a black forest cake.

Can I use frozen cherries to make the compote for black forest cake?

Yes, you can use frozen cherries to make a compote for the black forest cake. Make sure to thaw the cherries and drain any excess water before using them.

Can I add chocolate ganache to the cake for extra chocolate flavor?

Yes, you can use chocolate ganache as the filling along with chocolate filling to add extra flavor to the cake.

Print
clock clock iconcutlery cutlery iconflag flag iconfolder folder iconinstagram instagram iconpinterest pinterest iconfacebook facebook iconprint print iconsquares squares iconheart heart iconheart solid heart solid icon

Eggless Black Forest Cake

If there is one cake that is loved by everyone in this whole wide world and never fails to captivate the heart of people, it is the legendary black forest cake. Make this cake for your next birthday or any other occasion, and impress your loved ones. They will surely keep asking for more.

  • Total Time: 100 to 115 minutes

Ingredients

Scale

For Sponge

  • 200 g All-purpose flour 
  • 30 g Natural cocoa powder
  • 6 g Baking soda
  • 200 g Castor sugar 
  • 125 g Milk
  • 125 g Water
  • 50 g Oil
  • 50 g Melted butter
  • ½ tsp Vanilla essence
  • For Cherry Compote
  • 150 g Fresh cherries
  •  5 g Lemon juice
  •  ½ tsp Lemon zest
  •  23 g Castor sugar 
  •  1/8 tsp Salt 
  •  27 g Water 

For Chocolate Mousse

  • 120 g Whipping cream
  •  40 g Dark coverture
  •  15 g Fresh cream

For Chocolate Shavings

  • Dark compound chocolate slab

For Frosting

  • 100 g Sweetened whipping cream

For Decoration

  • Fresh cherries

Instructions

For Sponge

  1. Preheat the oven to 180°C or 350° F (OTG mode: upper rod + Lower rod + fan). Grease and line 6-inch round tins with oil and place butter paper at the bottom.
  2. In a bowl, sieve all the dry ingredients together, which are all-purpose flour, natural cocoa powder, baking soda, salt, and sugar.
  3. In another bowl, add all the liquid ingredients, milk, water, oil, and melted butter, then mix.
  4. Now gradually add liquid ingredients to the dry ingredients in parts and mix until a smooth batter is formed and there is no lump.
  5. Transfer the batter into the prepared tins equally.
  6. Bake them at 180°C or 350° F (OTG mode: Lower rod) for 30-35 minutes or until the toothpick inserted in the middle comes out clean.

For Chocolate Mousse

For Cherry Compote

For Soaking Syrup

  1. Add water to red wine and mix. Set aside for further use.

For Chocolate Shavings

  1. Using a vegetable peeler, start peeling the corner of the chocolate to get chocolate shavings.

For Frosting

  1. In a bowl, beat whipping cream with an electric hand beater until a soft peak is achieved.

Assembly

  • Author: Chef Aruna
  • Prep Time: 50 to 55 minutes
  • Assembly Time: 20 to 25 minutes
  • Cook Time: 30 to 35 minutes

Leave a Comment

Your email address will not be published. Required fields are marked *

Recipe rating 5 Stars 4 Stars 3 Stars 2 Stars 1 Star

“I achieved 10% of my short-term manifestation before my target date”
Before this program I knew a little about manifestations, but as I discovered during the program, I had a lot of limiting beliefs that kept me from fully embracing and accepting myself as a manifestor.
During this program I became more aware of what manifestation is and how powerful I am. I become more aware of my guides, of my highest self and that I can pull the best of my highest self into my present. Since this program I no longer wrestle with trying to convince myself that what I desire will happen. I know that it has happened, it is done and it is mine, here and now. I achieved 10% of my short-term manifestation before my target date, my eyesight has improved and I no longer need glasses for distance vision, only for reading, I gave myself a make-over as part of my commitment to my renewal and I began to de-clutter my space.
Trevor Buikies
Entrepreneur
Durban, South Africa
“My professional and personal life has seen significant positive changes”
Joining “The Art of Manifesting” was a life-changing decision for me. This is now the third time going through the quest and focusing on different areas of manifestation.
Regan is a powerful guide and she walks the talk.
This 28-day journey was a blend of practical techniques and profound energetical activations. I learned to visualize my goals clearly, expand my possibilities, and overcome the limitations holding me back from living a life i desire. The quest’s unique approach to identity hacking helped me align my inner self with my aspirations, making the manifestation process more effective and authentic.
The biggest takeaway for me was the acceleration of manifestation by bending time and tapping into the highest frequencies. The techniques taught in the quest enabled me to see results much faster than I expected. My professional and personal life has seen significant positive changes, and goals that once seemed unattainable are now within reach.
I’m beyond grateful for the wisdom and tools I’ve gained from this quest and Regan. It’s not just about manifesting; it’s about transforming your entire lifestyle. I highly recommend “The Art of Manifesting” to anyone looking to turn their dreams into reality.
Till Infinity
D
Dijana Llugolli
Coach
Stockholm, Sweden
“This course and listening to Regan’s podcasts gave me the tools to acknowledge my blocks and mindsets around drinking”
I have so enjoyed this journey with Regan, I am a new person as a result of this quest. I now have new beliefs & mindsets that I keep working on daily, hourly. A kinder and more compassionate version of me has emerged over this journey, and I love her!
This quest has resulted in me finding the lost me, the me that has been hidden under the voices of doubt, fear or just lack of awareness that I get to run my life not the other voices in my head or family and people around me. When we wire ourselves to the future version of us, then we make different choices and we are already a different person!
Thank you Regan, thank you Mindvalley, thank you tribe!!!! ❤❤, I love you all and wish you a magical Christmas and hope our paths may cross one day at Mindvalley events.
Rachael Courtenay
Orthopedic Physical Therapist
Royal Tunbridge Wells, United Kingdom
“My family’s net income unexpectedly increased while I was taking the quest”
Before taking this Quest I believed that the prerequisites of success were hard work, long hours, timing and a degree of luck; “1% inspiration and 99% perspiration” was my mantra. Trying to achieve success with this mindset was exhausting, frustrating and unsustainable.


I then discovered The Art of Manifesting … and was blown away.


The foundational teaching of focusing on your inner world to achieve has been transformative in the way I live my life. I now know that cultivating the feeling of already being in possession of that which you want, accelerates the manifestation of what you desire.


My family’s net income unexpectedly increased while I was taking the quest, and have discovered a path to manifest greater abundance in the year to come. But perhaps the biggest shift I experienced during this quest now knowing that I am worthy and deserving of abundance. Regan, I am eternally grateful to you, thank you :-)
Rahim Kassam
Financial Risk Analyst
Toronto, Canada
“Now, my manifestation is showing up right before my eyes in ways I hadn’t even considered”
Before this program, I believed somewhat in manifestation but never knew how to do it, or if it was real, and the little bit I did know ended up being completely wrong! This Quest has not only taught me how to manifest and put me on the path to doing it the right way, but I was actually able to manifest what I had set at the beginning.
I never thought it would actually come true, but I committed myself to the process and gave it 100% every day. And now, my manifestation is showing up right before my eyes in ways I hadn’t even considered. It’s truly blowing my mind.
I had a financial goal for the end of the Quest, and different opportunities for selling my artwork started coming up, and the deals are coming out almost to the exact number I had set.
Not only that, but I have truly transformed into a better version of myself in these short weeks, more than I had in the last few years, that my spouse has even noticed.
I’m so excited for what’s to come next and so grateful for this program. Thank you.
Hannah McGuire Silva
Artist
Olney, United States
“I have written a 50,000-word book, that is now in design”
I joined Mindvalley on New Year’s 2023. I am excited to share how life has significantly changed in the first 90 days of the year. Beginning with the Silva Method, I envisioned and transformed a dysfunctional personal relationship, into a loving, caring separation, allowing me the peace and serenity to follow my path, and my partner to choose his. In February while on the Art of Manifesting Quest I listed my intent to have a book written by May 2023, and have a speaking engagement booked by December 2023.
I have written a 50,000-word book, that is now in design, and a journal for Women seeking a deeper connection with themselves, also in design. Both will be uploaded via KDP Amazon self-publishing by May 1st.
I have booked a speaking engagement for May with the intent of having published books with me for sale.
Most importantly – this morning I changed my profile from ‘Document writer’ to ‘Author.’
Gratitude abounds!!!
Sharr L
Author
Kelowna, Canada