fbpx

Black Tie Mousse Cake Recipe

Home » Black Tie Mousse Cake Recipe

Black Tie Mousse Cake Recipe

Hi, my lovely bakers! 

Today, I have a really special recipe for you all! Especially for all chocolate lovers. What’s the recipe you’ll ask-it’s the famous Black Tie Mousse Cake. It’s heaven for all those who adore chocolate desserts. 

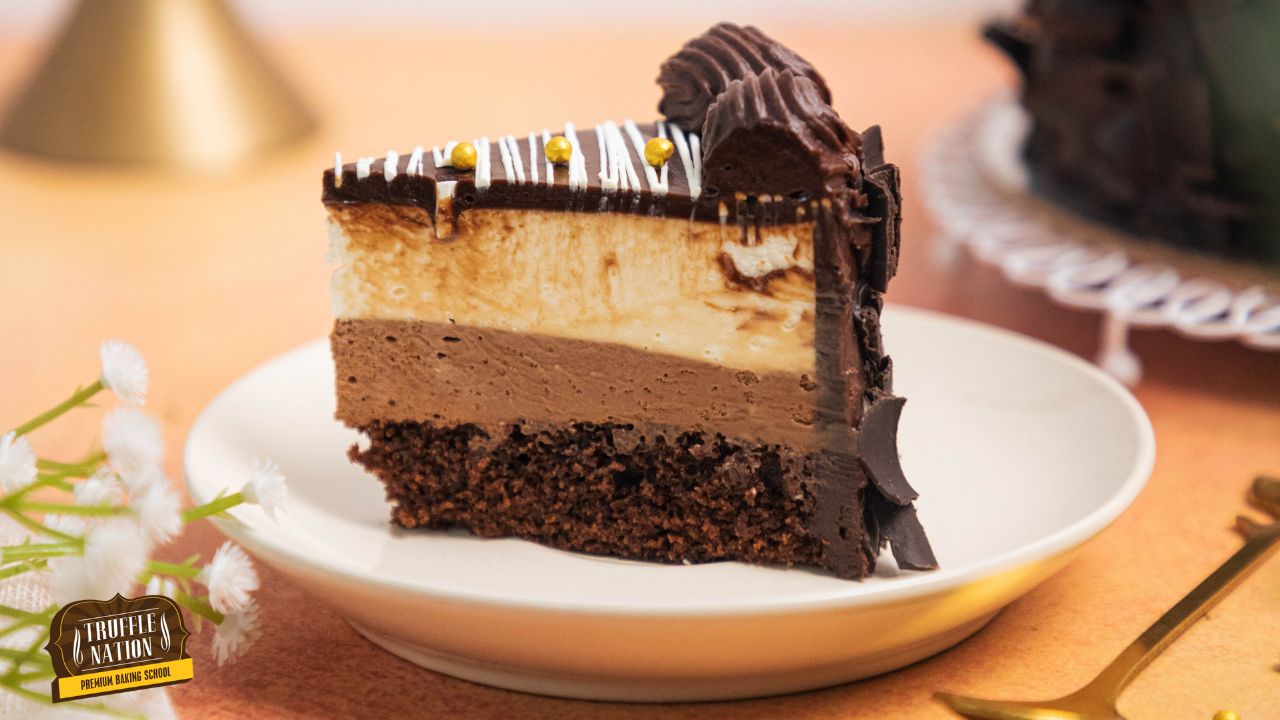
It’s a four-layered cake having a chocolate sponge, dark chocolate mousse, white chocolate mousse and dark chocolate ganache! Just hearing this is bringing water into my mouth! 

The day I heard about this famous cake by a Restaurant chain Olive Garden, I was determined to recreate it for my bakers. I had to-it’s so tempting. All the chocolate layers in one dessert. Such a unique textural combination of chocolate sponge, mousse and ganache. I’m sure you will love this recipe as much as I do. 

Why You’ll Love This Recipe? 

There’s chocolate written all over this dessert; do you need more reasons to love it? 

  • It’s All Chocolate: you get to experience different flavours and textures of chocolate in this one cake. It’s like having four different desserts in one cake. 
  • People’s Favorite: This will for sure be a people’s favourite chocolate recipe for any occasion. The silky smooth mousse and decadent ganache with a chocolate sponge base, it will definitely be the talk-of-the-party dessert. 
  • Simple yet Elegant: The cake may sound like too much work and can seem complicated with different layers. In reality, it’s pretty simple to follow, and each layer will take its own time to set, so you can take it slow to understand and make each layer. 

Important Ingredients Used In The Recipe

  • Natural Cocoa Powder: Getting that chocolatey flavour in a sponge requires good-quality cocoa powder. Natural cocoa powder is the best option here for the sponge recipe. 
  • Dark Couverture: I have used Belgian dark chocolate, which has 46.5% cocoa mass, for chocolate mousse and ganache. I find this perfectly sweet and bitter. If you prefer a more dense flavour, you can also go for 54.5% cocoa mass. 

White Couverture: I have used white couverture chocolate while making the white chocolate mousse. You may also use compound chocolate; however, for the best outcome, use couverture chocolate. 

  • Gelatin: since we have two mousse layers in the cake, a gelatin sheet is used to set them. Without the gelatin, mousse won’t set as firm as we need. 
  • Whipped cream: Non-dairy whipping cream has been used while making the two types of mousses. It’s firm, sweet and great to make airy mousses. Look for brands Rich’s or Tropolite. 

How To Make Black Tie Mousse Cake

Carefully follow method to make each layer and you will get the most delicious cake ever!

For the cake sponge:
  • Preparation: Collect all ingredients required for making the cake. Preheat the oven to 180C (OTG mode: upper rod + lower rod + fan). Line a 5.5-inch round ring by wrapping the bottom with cling-wrap twice and butter paper. Grease the inside of the ring with some oil. 
  • Buttermilk: Make the buttermilk first by mixing milk with apple cider vinegar. Keep it aside for a while. 
  • Dry Ingredients: Sieve all dry ingredients in a bowl-flour, sugar, baking powder, baking soda, cocoa powder, coffee powder and salt. Give it a stir. 
  • Wet Ingredients: I’m another bowl, mix all your liquid ingredients – eggs, vanilla essence, oil, buttermilk and hot water. 
  • Batter: Gradually add the mixture of the liquid ingredients to the dry ingredients and combine. Mix well so that no lumps are left. 
  • Bake: transfer the batter to the prepared mould and bake the cake at 180(OTG mode: lower rod only) for 15-20 minutes. 
For The Dark Chocolate Mousse:
  • Gelatin: take the gelatin sheet and soak it in some cold water. 
  • Ganache: Melt chocolate and warm the cream simultaneously in a microwave. Mix the two and form the ganache. Now add soaked gelatin and mix. Microwave the ganache for 5 seconds and mix to ensure the gelatin has completely dissolved in the ganache. 
  • Mousse: Beat the whipping cream till it reaches soft peaks. Fold the ganache into the whipped cream to make the chocolate mousse. 
  • Freeze: Pour the mousse over the baked and cooled sponge and set it in the freezer for two hours. 
For White Chocolate Mousse:
  • Gelatin: take the gelatin sheet and soak it in some cold water. 
  • Ganache: Melt white chocolate and warm the cream simultaneously in a microwave. Mix the two and form the ganache. Now add soaked gelatin and mix. Microwave the ganache for 5 seconds and mix to ensure the gelatin has completely dissolved in the ganache. To 
  • Mousse: Beat the whipping cream till it reaches soft peaks. Fold the ganache into the whipped cream to make the white chocolate mousse. 
  • Freeze: Pour the mousse over the set dark chocolate mousse and keep it in the freezer for two hours. 
For Ganache Topping:
  • Ganache: To make the ganache for the top layer, melt the dark chocolate and warm fresh cream in the microwave. Mix them to make a smooth ganache. 
For Assembly:
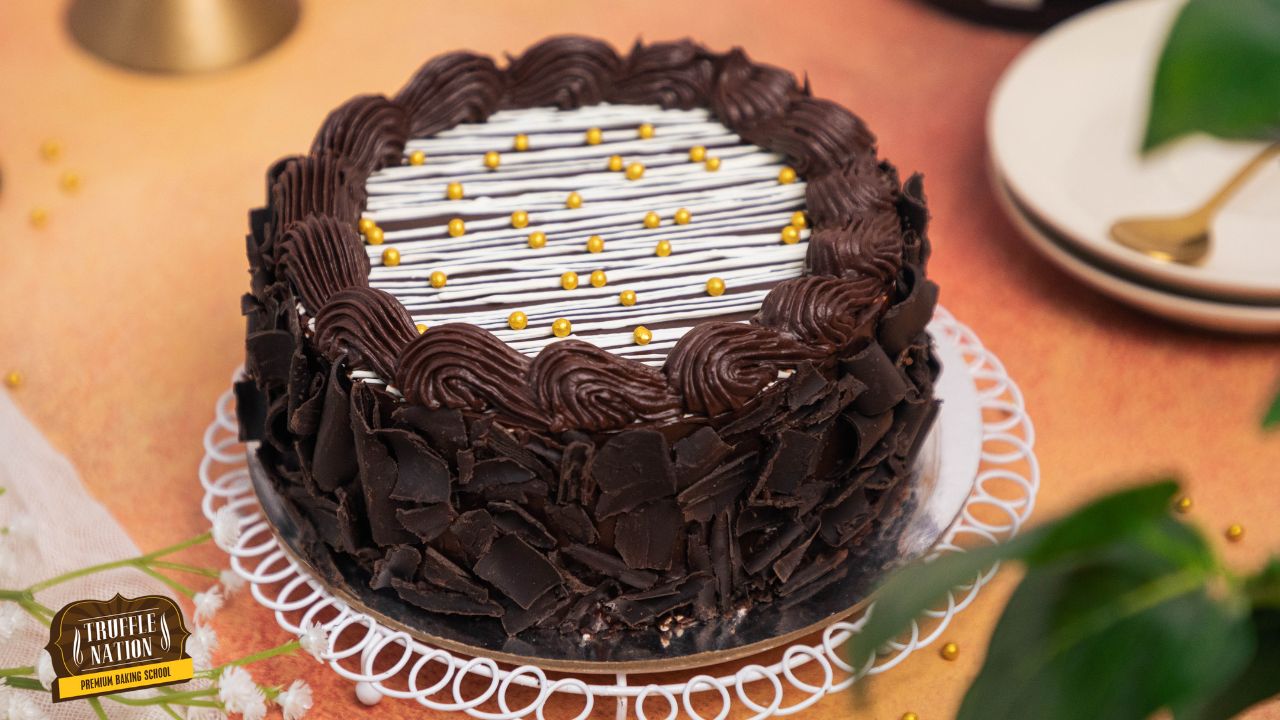
  • Frosting: Once both the mousse layers have been set, it’s time to frost the cake with dark chocolate ganache. Cover it completely and then transfer some ganache to a piping bag fitted with an open star nozzle. 
  • Garnish: Drizzle some melted white chocolate on the top to decorate the cake. Then pipe ganache on top edge with an open star nozzle. Garnish the side with chocolate curls, and finally, add some golden metallic sprinklers on top. 

Chef’s Tips For The Recipe

Tip for Gelatin

Dissolving the gelatin into the ganache is crucial. If the gelatin doesn’t dissolve, the mousse won’t set. Ensure while making the ganache that the gelatin sheet dissolves thoroughly. Also, you can use gelatin powder if you don’t have a sheet. One gelatin sheet is = 2g gelatin powder. Soak the powder in cold water (just enough to bloom it) and add the bloomed gelatin to the ganache. Dissolve it the same way. 

Tip for layering

The final appearance and intersection of the cake should be neat and clean. When pouting each layer, ensure the bottom layer is completely set. 

How To Store Black Tie Mousse Cake

Assemble mousse cake should be stored in the refrigerator (in an airtight box if possible). Consume it within three days. 

More Easy Recipes

Do try our other cake recipes. They are absolutely delicious

Eggless Oreo Cake

Victoria Sponge Cake With Strawberry Jam

Mini 4-inch Cake

Print
clock clock iconcutlery cutlery iconflag flag iconfolder folder iconinstagram instagram iconpinterest pinterest iconfacebook facebook iconprint print iconsquares squares iconheart heart iconheart solid heart solid icon

Black Tie Mousse Cake Recipe

Black Tie Mousse Cake: A perfect example of what decadent chocolate dessert should be, with each layer representing its own flavour and texture. 

Ingredients

Scale

For Chocolate Sponge:

  • 45g Flour
  • 65g Castor Sugar
  • 6g Natural Cocoa Powder
  • 1g Baking Powder
  • 1g Baking Soda
  • 1 Pinch of Salt
  • 1/2 tbsp Coffee Powder
  • 1/8 tsp Vanilla Essence
  • 1/2 no. Egg
  • 40ml Hot Water
  • 25ml Milk
  • 1/8 tsp Apple Cider Vinegar
  • 20g Oil

For Dark Chocolate Mousse:

  • 75g Dark couverture
  • 37g Fresh Cream
  • 1 no. Gelatin Sheet
  • 80g Whipping Cream 

For White Chocolate Mousse:

  • 75g White couverture chocolate
  • 37g Fresh Cream
  • 1 no. Gelatin Sheet
  • 80g Whipping Cream

For Frosting:

  • 150g Dark couverture chocolate
  • 75g Fresh Cream

For Decoration:

  • Chocolate curls
  • Melted white chocolate
  • Golden metallic sprinkles


Instructions

Method For Chocolate Sponge:

  1.  Preheat the oven to 180C (OTG mode: upper rod + lower rod + fan). Prepare a 5.5-inch round ring by cling-wrapping it twice, then grease it with some oil and place butter paper at the bottom.
  2. Now, in a small bowl, mix milk and apple cider vinegar to make buttermilk and keep it aside for later use.
  3. In a bowl, sieve all the dry ingredients, which are flour, baking powder, baking soda, sugar, natural cocoa powder, salt and salt.
  4. In a different bowl, mix all the liquid ingredients, which are eggs, hot water, oil, buttermilk and vanilla essence.
  5. Now add the liquid mixture to the dry mixture gradually and mix to get a smooth and lump-free batter.
  6. Transfer the batter to the prepared ring and bake at 180C (OTG Mode: Lower rod only) for 20 minutes or until the toothpick inserted in the middle comes out clean.

Method For Dark Chocolate Mousse:

  1. Soak the gelatin sheet in cold water and keep it aside.
  2. Now, in a bowl, melt chocolate and warm fresh cream simultaneously.
  3. Add fresh cream to the melted chocolate to make the ganache. 
  4. Squeeze the soaked gelatin sheet to remove the excess water, add it to the ganache, and mix.
  5. Microwave the ganache again for 5 seconds, then keep mixing until the gelatin sheet is dissolved completely.
  6. Now beat whipping cream until it reaches the soft peak stage, then fold in the ganache to it.
  7. Pour the mousse over the baked and cooled sponge, then keep it in the freezer for 2 hours.

Method For White Chocolate Mousse:

  1. Soak the gelatin sheet in cold water and keep it aside.
  2. Now, in a bowl, melt white chocolate and warm fresh cream simultaneously.
  3. Add fresh cream to the melted chocolate to make the ganache. 
  4. Squeeze the soaked gelatin sheet to remove the excess water, add it to the ganache, and mix.
  5. Microwave the ganache again for 5 seconds, then keep mixing until the gelatin sheet is dissolved completely.
  6. Now beat whipping cream until it reaches the soft peak stage, then fold in the ganache to it.
  7. Pour the white chocolate mousse over the baked and cooled sponge, then keep it in the freezer for 2 hours.

Method For Frosting:

  1. In a bowl, melt the dark chocolate and warm fresh cream simultaneously.
  2. Add fresh cream to the melted chocolate to make the ganache. 

Method For Assembly:

  1. Once all the layers are set properly, frost the entire cake with ganache.
  2. Now, drizzle melted white chocolate on top.
  3. Stick chocolate curls on the sides of the cake.
  4. Pipe ganache at the top edge of the cake using open star nozzle.
  5. Garnish the top with golden metallic sprinkles.
  • Author: Chef Mansi Jain

Leave a Comment

Your email address will not be published. Required fields are marked *

Recipe rating 5 Stars 4 Stars 3 Stars 2 Stars 1 Star

“I achieved 10% of my short-term manifestation before my target date”
Before this program I knew a little about manifestations, but as I discovered during the program, I had a lot of limiting beliefs that kept me from fully embracing and accepting myself as a manifestor.
During this program I became more aware of what manifestation is and how powerful I am. I become more aware of my guides, of my highest self and that I can pull the best of my highest self into my present. Since this program I no longer wrestle with trying to convince myself that what I desire will happen. I know that it has happened, it is done and it is mine, here and now. I achieved 10% of my short-term manifestation before my target date, my eyesight has improved and I no longer need glasses for distance vision, only for reading, I gave myself a make-over as part of my commitment to my renewal and I began to de-clutter my space.
Trevor Buikies
Entrepreneur
Durban, South Africa
“My professional and personal life has seen significant positive changes”
Joining “The Art of Manifesting” was a life-changing decision for me. This is now the third time going through the quest and focusing on different areas of manifestation.
Regan is a powerful guide and she walks the talk.
This 28-day journey was a blend of practical techniques and profound energetical activations. I learned to visualize my goals clearly, expand my possibilities, and overcome the limitations holding me back from living a life i desire. The quest’s unique approach to identity hacking helped me align my inner self with my aspirations, making the manifestation process more effective and authentic.
The biggest takeaway for me was the acceleration of manifestation by bending time and tapping into the highest frequencies. The techniques taught in the quest enabled me to see results much faster than I expected. My professional and personal life has seen significant positive changes, and goals that once seemed unattainable are now within reach.
I’m beyond grateful for the wisdom and tools I’ve gained from this quest and Regan. It’s not just about manifesting; it’s about transforming your entire lifestyle. I highly recommend “The Art of Manifesting” to anyone looking to turn their dreams into reality.
Till Infinity
D
Dijana Llugolli
Coach
Stockholm, Sweden
“This course and listening to Regan’s podcasts gave me the tools to acknowledge my blocks and mindsets around drinking”
I have so enjoyed this journey with Regan, I am a new person as a result of this quest. I now have new beliefs & mindsets that I keep working on daily, hourly. A kinder and more compassionate version of me has emerged over this journey, and I love her!
This quest has resulted in me finding the lost me, the me that has been hidden under the voices of doubt, fear or just lack of awareness that I get to run my life not the other voices in my head or family and people around me. When we wire ourselves to the future version of us, then we make different choices and we are already a different person!
Thank you Regan, thank you Mindvalley, thank you tribe!!!! ❤❤, I love you all and wish you a magical Christmas and hope our paths may cross one day at Mindvalley events.
Rachael Courtenay
Orthopedic Physical Therapist
Royal Tunbridge Wells, United Kingdom
“My family’s net income unexpectedly increased while I was taking the quest”
Before taking this Quest I believed that the prerequisites of success were hard work, long hours, timing and a degree of luck; “1% inspiration and 99% perspiration” was my mantra. Trying to achieve success with this mindset was exhausting, frustrating and unsustainable.


I then discovered The Art of Manifesting … and was blown away.


The foundational teaching of focusing on your inner world to achieve has been transformative in the way I live my life. I now know that cultivating the feeling of already being in possession of that which you want, accelerates the manifestation of what you desire.


My family’s net income unexpectedly increased while I was taking the quest, and have discovered a path to manifest greater abundance in the year to come. But perhaps the biggest shift I experienced during this quest now knowing that I am worthy and deserving of abundance. Regan, I am eternally grateful to you, thank you :-)
Rahim Kassam
Financial Risk Analyst
Toronto, Canada
“Now, my manifestation is showing up right before my eyes in ways I hadn’t even considered”
Before this program, I believed somewhat in manifestation but never knew how to do it, or if it was real, and the little bit I did know ended up being completely wrong! This Quest has not only taught me how to manifest and put me on the path to doing it the right way, but I was actually able to manifest what I had set at the beginning.
I never thought it would actually come true, but I committed myself to the process and gave it 100% every day. And now, my manifestation is showing up right before my eyes in ways I hadn’t even considered. It’s truly blowing my mind.
I had a financial goal for the end of the Quest, and different opportunities for selling my artwork started coming up, and the deals are coming out almost to the exact number I had set.
Not only that, but I have truly transformed into a better version of myself in these short weeks, more than I had in the last few years, that my spouse has even noticed.
I’m so excited for what’s to come next and so grateful for this program. Thank you.
Hannah McGuire Silva
Artist
Olney, United States
“I have written a 50,000-word book, that is now in design”
I joined Mindvalley on New Year’s 2023. I am excited to share how life has significantly changed in the first 90 days of the year. Beginning with the Silva Method, I envisioned and transformed a dysfunctional personal relationship, into a loving, caring separation, allowing me the peace and serenity to follow my path, and my partner to choose his. In February while on the Art of Manifesting Quest I listed my intent to have a book written by May 2023, and have a speaking engagement booked by December 2023.
I have written a 50,000-word book, that is now in design, and a journal for Women seeking a deeper connection with themselves, also in design. Both will be uploaded via KDP Amazon self-publishing by May 1st.
I have booked a speaking engagement for May with the intent of having published books with me for sale.
Most importantly – this morning I changed my profile from ‘Document writer’ to ‘Author.’
Gratitude abounds!!!
Sharr L
Author
Kelowna, Canada