fbpx

Victoria Sponge Cake Recipe with Strawberry Jam

Home » Victoria Sponge Cake Recipe with Strawberry Jam

Victoria Sponge Cake Recipe with Strawberry Jam

One of the most sought-after recipes for bakers is that of the Victoria Sponge Cake! 

This classic cake dates back to the time of Queen Victoria, which the royal patron very much enjoyed. 

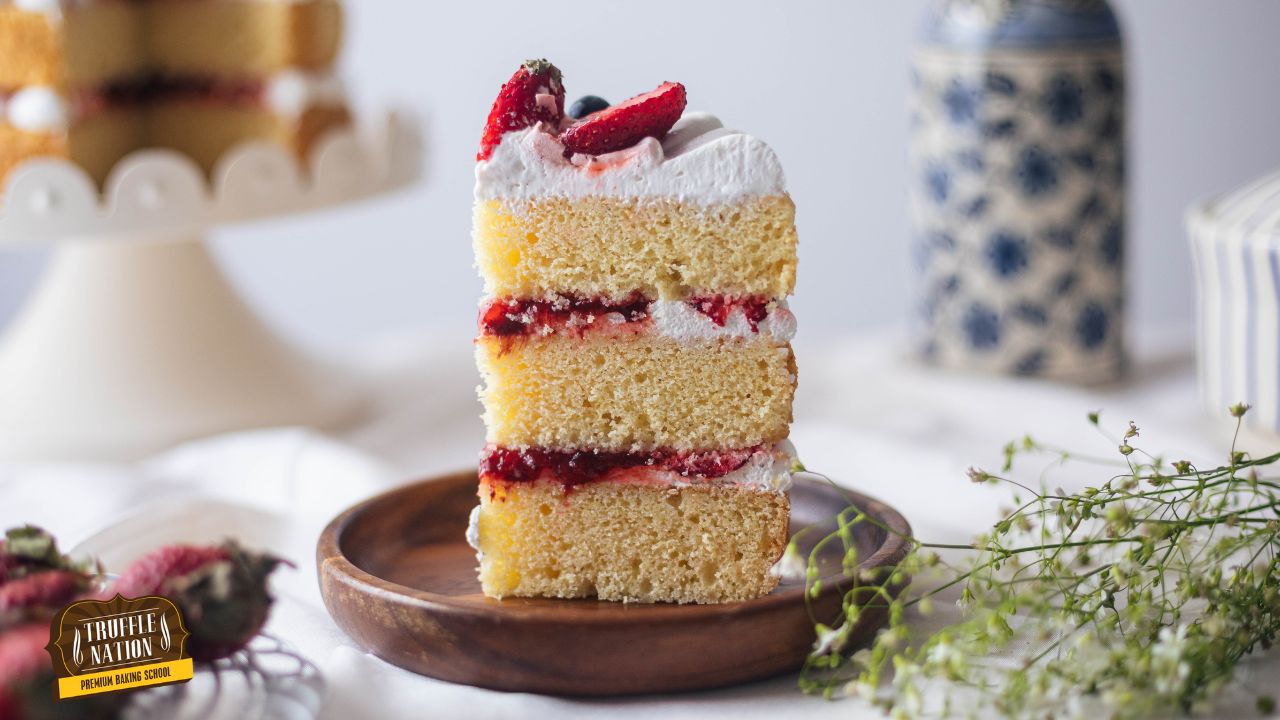
The cake has three elements-vanilla sponge, also called the Victoria sponge, whipped cream and strawberry jam!

The name Victoria sponge was given in honour of the royal Queen Victoria when a victorious invention of baking powder was made and put in a cake recipe.

Yes, baking powder was invented by a British food manufacturer Alfred Bird in 1843. As the Queen started to enjoy her high tea, the cake was introduced to the high tea menu and soon became a regular dessert. 

The sponge is considered soft as eggs, and baking powder gives a very fluffy texture to it. The cake is strong enough to hold any filling and yet soft as it has adequate air bubbles for softness. 

The sponge is classically paired with whipped cream and strawberry jam. With time, the sponge is used in many decorative and celebratory cakes. 

Victoria Cake Recipe Video Tutorial

Why You’ll Love This Recipe? 

  • Classic recipe: the recipe is easy to follow, and with simple steps, you get to bake a classic sponge recipe. This is one of the most used cake recipes for different celebration cakes. 
  • Easy to assemble: the cake is not very elaborately decorated. It’s simple yet elegantly designed. The assembly is pretty easy to follow. 
  • Flavorsome: the cake has the best combination of classic vanilla and strawberry. Everyone loves this pairing. 

Important Ingredients Used In Victoria Sponge Cake

The sponge has just six ingredients which makes for one of the best sponges.

The main ingredients, which are butter, sugar, eggs and flour, all go in the same ratio (similar to pound cake). It’s the addition of baking powder that differentiates it from the pound cake, making it softer. 

  • Salted Butter: salted butter is one of the main ingredients in the cake that provides a buttery flavour. It goes in a high ratio, making the fat content high in the cake. It adds moisture and tenderness in the sponge.
  • Castor Sugar: castor sugar, when beaten with butter, helps to trap the air bubbles that we need so that the cake is soft. 
  • Eggs-the sponge gets its hint of colour, moisture and aeration from a high quantity of eggs. It’s a classic recipe that contains a staple ingredient, which is the egg.
  • Baking powder: the king of the ingredients for this cake is baking powder. This was the first cake where the baking powder was added, and since then, it has become a significant ingredient for almost all sponge recipes! The softness baking powder provides from the reaction of the powder with liquid which creates carbon dioxide. The carbon dioxide makes air bubbles and makes the cake rise high and hence soft. 

How To Make Victoria Sponge Cake

  • Prepare the sponge: we will use the creaming method to make the sponge. Butter is beaten with sugar until it’s quite light and fluffy. Then eggs are added, and finally, the rest of the ingredients. The creaming method ensures a good amount of air is incorporated into the batter. 
  • Make the jam: skip using the store-bought jam and make your own strawberry jam easily at home. simply cook fresh strawberries with sugar, cream of tartar and lemon zest until it thickens. this will only take a few minutes. once it reaches the desired consistency, let it cool down before using.
  • Whipped Cream: Along with jam, we have whipped cream as well. So whip non-dairy whipping cream till soft peaks, and you are done. 
  • Assembly: there is no need to cut layers from the sponges as we will be stacking whole cakes as a single layer. Place the sponge layer first, soak with soaking syrup and pipe the whipped cream. Add a layer of jam and pipe blobs of whipped cream on the edges. Repeating the same for the rest of the layers, we will get the cake ready in no time. 
  • Garnish: remember to garnish your products as it makes the baked goods appealing. We will be decorating the cake with fresh strawberries and blueberries. 

Chef’s Tips For The Recipe

Mix Dry Ingredients in Batches

Sift the flour and baking powder and add in batches so that there are no flour pockets left in the batter. 

Piping Tip

Pipe thick blobs on the edges to be visible from the outside. 

Substitutes

Use vanilla essence in place of paste in whipped cream if the paste is not available. Also, You can skip applying neutral glaze if you want.

How To Store The Cake? 

Store the assembled cake in the fridge and consume it within 3 days.

For just the sponge, cling wrap it and refrigerate for up to a week and for a month in freezer.

The strawberry jam can be stored in a glass jar in refrigerator for 2-3 weeks.

Leftover whipped cream should be stored in an airtight box in the refrigerator. consume it within 3 days.

More Easy Recipes

Try our other recipes like Mini 4-inch Cake and Blueberry Chocolate Cake.

Frequently Asked Questions

Why is my Victoria cake not spongy? 

The cake texture would not be spongy or soft if the butter used were too soft or too cold. When the butter is too soft, it makes the cake heavy and dense. If the butter is too cold, it takes time to soften while creaming, leading to overmixing and heavy cake. 

Why is my Victoria sponge soggy in the middle? 

The cake can become soggy in the middle if the cake is under-baked or the oven temperature is lower. Make sure to use an oven thermometer to keep a check on oven temperature. Look for signs that suggest the cake is baked-toothpick test is done, and the edges of the cake have contracted. 

Why is my Victoria sponge dry? 

The reason would be too much flour. Check the ratio of flour to other ingredients. Also, avoid overbaking, which makes cakes dry. 

Should you store Victoria sponge in the fridge? 

The assembled cake needs to be refrigerated as it has cream and jam in it. It can stay in the fridge for 3 days. 

What should the consistency Victoria sponge mix be? 

It should be at dropping consistency. It’s neither too dry nor too flowy. 
Print
clock clock iconcutlery cutlery iconflag flag iconfolder folder iconinstagram instagram iconpinterest pinterest iconfacebook facebook iconprint print iconsquares squares iconheart heart iconheart solid heart solid icon

Victoria Sponge Cake Recipe with Strawberry Jam

Start your baking journey by making one of the classic cake recipes- The Victoria Sponge and pair it with delicious homemade strawberry jam along with whipped cream.

  • Total Time: 50 to 65 minutes

Ingredients

Scale

For sponge:


  • 225 g All-Purpose Flour 
  • 1.5 tsp Baking powder
  • 225 g Castor sugar
  • 225 g Eggs
  • 225 g Salted butter
  • 1.5 tsp Vanilla essence

For Strawberry Jam:

  • 150 g Fresh strawberries
  • 125 g Castor sugar 
  • 1/4 tsp Cream of tartar 
  • Zest of 1 Lemon 

For Layering:

  • 200 g Non-dairy whipping cream 
  • 1 tsp Vanilla bean paste 
  • 200 g Strawberry jam 
  • Fresh strawberries (sliced) 


For Garnish:

  • Fresh strawberries cut in halves
  • Fresh blueberries
  • Neutral glaze

Instructions

For sponge:

  1. Preheat the oven at 180c (otg mode: upper rod + lower rod + fan). Grease and line 3 round 6-inch tins with butter paper. 
  2. In a bowl, beat butter till it is pale and fluffy. 
  3. Add Castor sugar and cream until the butter becomes airier. 
  4. Now add in the eggs gradually along with vanilla and beat again
  5. Lastly, fold the sifted flour and baking powder into the mixture in three batches. Mix well. 
  6. Divide the batter equally into three tins. 
  7. Bake at 180C (otg mode: lower rod only) for 35-40 minutes or until the toothpick comes out clean when inserted in the centre. 

For Whipped Cream:


  1. In a mixing bowl, take cold non-dairy whipping cream and add vanilla bean paste to it. 
  2. Start beating and continue till you get soft peaks. This could take 2-3 minutes. 
  3. Transfer the cream to a piping bag fitted with a round nozzle.


For Strawberry Jam


  1. Cut each strawberry into 4 parts.
  2. In a heavy bottom pan, put the Chopped strawberries along with castor sugar.
  3. Add cream of tartar and lemon zest.
  4. Turn on the heat and the let the sugar melt.
  5. Once sugar is dissolved, use a hand blender to make the mixture into a puree.
  6. Keep cooking for 5-7 minutes while stirring regularly.
  7. Once the jam gets thick, test the doneness using back of the spoon. If the jam covers/sticks to the back and does not drop then the jam is done.
  8. Transfer the jam into a piping bag once it cools down.

Assembly 

  1. Demould the sponges and cut the dome from all three using a serrated knife. 
  2. Now place one sponge on a turn table and pipe some whipped cream at the centre. 
  3. Now add some strawberry jam over the cream. 
  4. Pipe blobs of cream all over the edges and then place sliced strawberries on them. 
  5. Put the second sponge layer and repeat the same method of layering. 
  6. Place the third layer and pipe the blobs of cream on the edges and some cream in the middle. 
  7. Decorate the top with slices of strawberries and fresh blueberries. 
  8. To give the strawberries a shine, brush some diluted neutral glaze on them using a pastry brush. 


  • Author: Chef Mansi Jain
  • Prep Time: 15 minutes
  • Cook Time: 35 to 40 minutes

Leave a Comment

Your email address will not be published. Required fields are marked *

Recipe rating 5 Stars 4 Stars 3 Stars 2 Stars 1 Star

“I achieved 10% of my short-term manifestation before my target date”
Before this program I knew a little about manifestations, but as I discovered during the program, I had a lot of limiting beliefs that kept me from fully embracing and accepting myself as a manifestor.
During this program I became more aware of what manifestation is and how powerful I am. I become more aware of my guides, of my highest self and that I can pull the best of my highest self into my present. Since this program I no longer wrestle with trying to convince myself that what I desire will happen. I know that it has happened, it is done and it is mine, here and now. I achieved 10% of my short-term manifestation before my target date, my eyesight has improved and I no longer need glasses for distance vision, only for reading, I gave myself a make-over as part of my commitment to my renewal and I began to de-clutter my space.
Trevor Buikies
Entrepreneur
Durban, South Africa
“My professional and personal life has seen significant positive changes”
Joining “The Art of Manifesting” was a life-changing decision for me. This is now the third time going through the quest and focusing on different areas of manifestation.
Regan is a powerful guide and she walks the talk.
This 28-day journey was a blend of practical techniques and profound energetical activations. I learned to visualize my goals clearly, expand my possibilities, and overcome the limitations holding me back from living a life i desire. The quest’s unique approach to identity hacking helped me align my inner self with my aspirations, making the manifestation process more effective and authentic.
The biggest takeaway for me was the acceleration of manifestation by bending time and tapping into the highest frequencies. The techniques taught in the quest enabled me to see results much faster than I expected. My professional and personal life has seen significant positive changes, and goals that once seemed unattainable are now within reach.
I’m beyond grateful for the wisdom and tools I’ve gained from this quest and Regan. It’s not just about manifesting; it’s about transforming your entire lifestyle. I highly recommend “The Art of Manifesting” to anyone looking to turn their dreams into reality.
Till Infinity
D
Dijana Llugolli
Coach
Stockholm, Sweden
“This course and listening to Regan’s podcasts gave me the tools to acknowledge my blocks and mindsets around drinking”
I have so enjoyed this journey with Regan, I am a new person as a result of this quest. I now have new beliefs & mindsets that I keep working on daily, hourly. A kinder and more compassionate version of me has emerged over this journey, and I love her!
This quest has resulted in me finding the lost me, the me that has been hidden under the voices of doubt, fear or just lack of awareness that I get to run my life not the other voices in my head or family and people around me. When we wire ourselves to the future version of us, then we make different choices and we are already a different person!
Thank you Regan, thank you Mindvalley, thank you tribe!!!! ❤❤, I love you all and wish you a magical Christmas and hope our paths may cross one day at Mindvalley events.
Rachael Courtenay
Orthopedic Physical Therapist
Royal Tunbridge Wells, United Kingdom
“My family’s net income unexpectedly increased while I was taking the quest”
Before taking this Quest I believed that the prerequisites of success were hard work, long hours, timing and a degree of luck; “1% inspiration and 99% perspiration” was my mantra. Trying to achieve success with this mindset was exhausting, frustrating and unsustainable.


I then discovered The Art of Manifesting … and was blown away.


The foundational teaching of focusing on your inner world to achieve has been transformative in the way I live my life. I now know that cultivating the feeling of already being in possession of that which you want, accelerates the manifestation of what you desire.


My family’s net income unexpectedly increased while I was taking the quest, and have discovered a path to manifest greater abundance in the year to come. But perhaps the biggest shift I experienced during this quest now knowing that I am worthy and deserving of abundance. Regan, I am eternally grateful to you, thank you :-)
Rahim Kassam
Financial Risk Analyst
Toronto, Canada
“Now, my manifestation is showing up right before my eyes in ways I hadn’t even considered”
Before this program, I believed somewhat in manifestation but never knew how to do it, or if it was real, and the little bit I did know ended up being completely wrong! This Quest has not only taught me how to manifest and put me on the path to doing it the right way, but I was actually able to manifest what I had set at the beginning.
I never thought it would actually come true, but I committed myself to the process and gave it 100% every day. And now, my manifestation is showing up right before my eyes in ways I hadn’t even considered. It’s truly blowing my mind.
I had a financial goal for the end of the Quest, and different opportunities for selling my artwork started coming up, and the deals are coming out almost to the exact number I had set.
Not only that, but I have truly transformed into a better version of myself in these short weeks, more than I had in the last few years, that my spouse has even noticed.
I’m so excited for what’s to come next and so grateful for this program. Thank you.
Hannah McGuire Silva
Artist
Olney, United States
“I have written a 50,000-word book, that is now in design”
I joined Mindvalley on New Year’s 2023. I am excited to share how life has significantly changed in the first 90 days of the year. Beginning with the Silva Method, I envisioned and transformed a dysfunctional personal relationship, into a loving, caring separation, allowing me the peace and serenity to follow my path, and my partner to choose his. In February while on the Art of Manifesting Quest I listed my intent to have a book written by May 2023, and have a speaking engagement booked by December 2023.
I have written a 50,000-word book, that is now in design, and a journal for Women seeking a deeper connection with themselves, also in design. Both will be uploaded via KDP Amazon self-publishing by May 1st.
I have booked a speaking engagement for May with the intent of having published books with me for sale.
Most importantly – this morning I changed my profile from ‘Document writer’ to ‘Author.’
Gratitude abounds!!!
Sharr L
Author
Kelowna, Canada