fbpx

Eggless Chocolate Mousse Cake

Home » Eggless Chocolate Mousse Cake

Eggless Chocolate Mousse Cake

A Chocolate cake is an all-time favourite dessert, right? But what if we can modify a classic chocolate cake into a modern mousse cake?

I bring you the ultimate and best chocolate mousse cake you will ever taste! Silky smooth mousse with soft chocolate sponge and topped with gooey dark chocolate ganache – it’s pure heaven!!

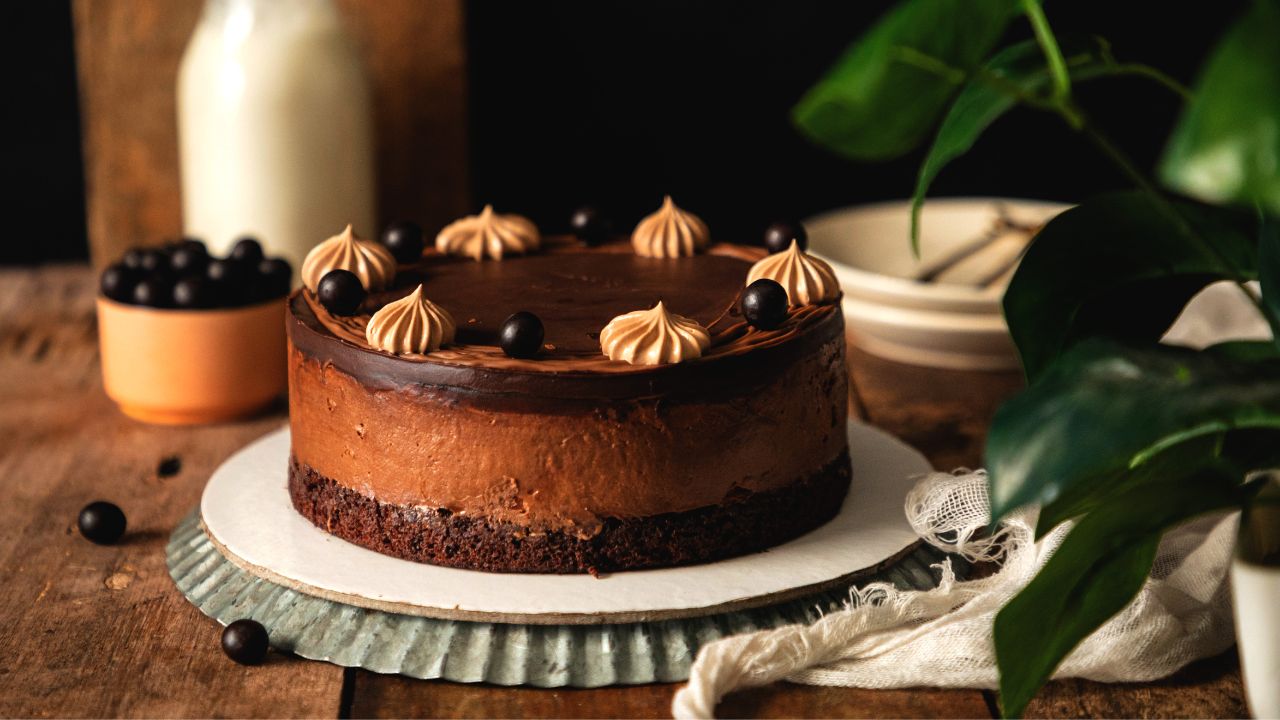
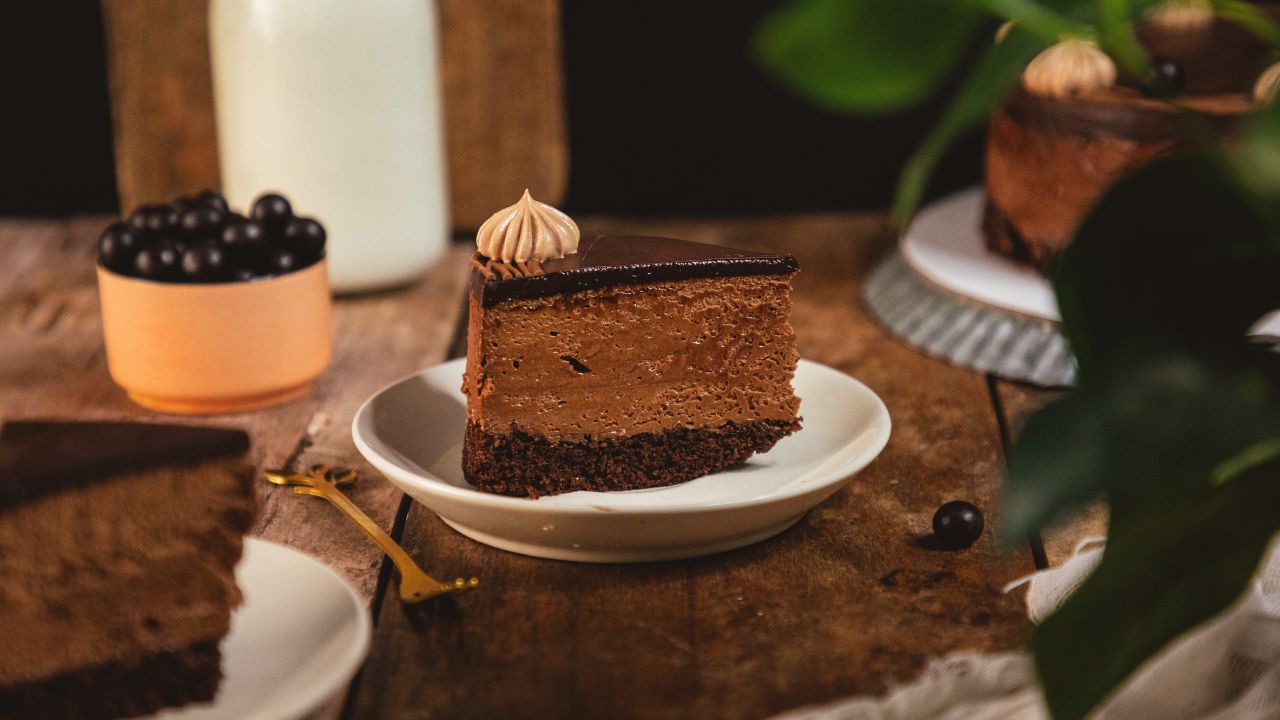
So, how is a mousse cake different from any other cake? A mousse cake is an advanced version of a basic cake where at the bottom you get a chocolate sponge layer, in the middle there is fluffy and foamy mousse, and the third layer is the delicious ganache!

You will experience multiple textures while eating this mousse cake. The sponge will give a chewy texture, whereas the mousse will provide a silky, smooth and fluffy texture. Then there is ganache that has a gooey, dense texture! All three components have their unique texture, and together, they complement each other very well. 

Coming to the taste, then, of course, you get to taste the best chocolate flavour in three different styles. The intensity of dark chocolate ganache and sponge is balanced by a light, airy mousse. 

Eggless Chocolate Mousse Cake Video Tutorial

Why You’ll Love This Recipe? 

  • It’s all about chocolate: If you have been looking for a unique chocolate cake, then this recipe is for you. All elements of the cake speak of chocolate. It’s a perfect cake for all chocolate lovers. 
  • Elegant: You can easily ditch a regular layered cake for this sophisticated mousse cake. We have been eating layered cakes for ages. It’s time we provide something new, unique and elegant for special occasions. 
  • Showcasing Your Skills: This mousse cake helps you learn various new techniques which enhances your skills as a baker. When you make this dessert, it will give you an opportunity to showcase your skills to your friends and family. 
  • It’s Eggless: You will hardly find eggless mousse cakes in the market. Most of these cakes contain either eggs or gelatin, which aren’t vegetarian-friendly. This gives you an edge over others as you will be making a delicious eggless mousse cake. 

Important Ingredients Used In The Recipe

  • Natural Cocoa Powder: The flavor of chocolate you get in the sponge is from the cocoa powder. Always use the best quality cocoa powder, as that will give the desired flavor as well as the texture of the cake. 
  • Apple Cider Vinegar: The addition of apple cider vinegar to a cake helps make it soft and tender. This is because it reacts with baking soda present in the batter to give aeration, hence making it soft. 
  • Dark chocolate: To make ganache and mousse, we have used (and recommend) 46.5% dark couverture chocolate. You can use compound chocolate as well, but that will alter the taste and quality of the mousse cake. 
  • Whipping cream: The mousse is light and airy because of whipped cream. Non-dairy whipping cream is whipped till soft peaks and then folded into a chocolate ganache to give that foamy texture. 
  • Agar agar: This is a vegetarian substitute for gelatin. It is also known as China grass and comes in three forms-powder, flakes and sheets/noddles. It is made from seaweed extract. Originally, mousse is made using eggs and gelatin (to set the mousse). However, Since the mousse cake is vegetarian friendly, the mousse itself doesn’t have eggs in it, and to set the mousse, agar agar is used. 

How To Make Eggless Chocolate Mousse Cake

Preparation: Correctly weigh and gather all ingredients needed to make the chocolate mousse cake. A detailed list of ingredients with their quantities and instructions is given in the recipe card below. Preheat the oven to 160C (OTG mode: upper rod + lower rod + fan). Grease the insides of a 6-inch round ring. 

Method For Chocolate Sponge

Wet Ingredients: Mix all wet ingredients, milk, vinegar, oil and vanilla essence in a bowl. Give it a mix. 

Dry Ingredients: In a separate bowl, sieve all dry ingredients: flour, cocoa powder, sugar, salt and baking soda. Stir to mix it. 

Make Batter: Now add dry ingredients to the wet ingredients in batches. Mix it well to make a smooth batter. Ensure its lump-free. 

Bake: Transfer the batter to the prepared ring and bake it at 160C (OTG mode: lower rod only) for 25-30 minutes or until a toothpick comes out clean when inserted in the centre. 

Method For Mousse

Make Ganache: Melt dark couverture chocolate and warm fresh cream in the microwave in separate bowls. Mix the two to make a smooth ganache. 

Add Agar agar: Now, add agar agar to warm the ganache and mix it well. Ensure that the entire agar agar has been dissolved. 

Beat Whipping Cream: Beat non-dairy whipping cream in another bowl using an electric hand beater. Whip till it reaches the soft peaks stage. 

Make Mousse: Fold the ganache into the whipped cream and gently mix to form the chocolate mousse. 

Method For Top Ganache Layer

Melt Chocolate: First, melt dark chocolate in the microwave. Stir in between to avoid burning. 

Warm Cream: In a separate bowl, warm the fresh cream in the microwave. Do not boil the cream. 

Make Ganache: Add warm cream to the melted chocolate and mix until you get a smooth, shiny ganache. 

Method For Mousse (For Decoration) 

Melt Chocolate: Take Chopped chocolate and melt it in a microwave in blasts of 20 seconds. Stir well. 

Beat Whipping Cream: Beat non-dairy whipping cream using an electric hand beater until it gets soft peaks. 

Make Mousse: Add slightly warm (not hot) chocolate to the whipped cream and mix thoroughly to make the mousse. Transfer the mousse to a piping bag fitted with an open star nozzle. 

Method For Assembly

Place Sponge in Ring: Take a 6-inch round ring and cling wrap it twice from one side. Place it in a baking tray. Cut any dome from the chocolate sponge to make an even top. Now, place the sponge layer into the prepared ring. 

Add Mousse Layer: Line the inside edge of the ring with an acetate sheet before adding mousse to it. Transfer the chocolate mousse into the mould and over the sponge. Tap the tray to evenly spread the mousse. 

Freeze: Put the cake in the freezer to set overnight. You may loosely cling wrap the top to avoid condensation. 

Add Ganache Layer: Once the mousse is set, add the ganache layer and spread it using a bent palette knife. Put this in the freezer for 20-30 minutes or until the ganache sets. 

Garnish: Take melted milk chocolate in a piping bag and make circles on the top edge of the cake. Make around 5-6 circles one over the other. Now, pipe blobs of chocolate mousse that you prepared for piping. Make 6 blobs at equal distance. Finally, garnish by placing chocolate balls in between two blobs. 

Chef’s Tips For The Recipe

Tip For Agar Agar

While adding agar agar to the ganache, make sure the ganache is warm. If the ganache is not hot or warm, agar agar won’t dissolve properly into it, which will eventually hinder setting the mousse. 

Be Careful While Making Mousse

When folding ganache or melted chocolate into the whipped cream, ensure the mixing is not too vigorous, as you may lose the aeration of the whipped cream. Also, the ganache or chocolate must be slightly warm when added. Since whipped cream is cold, if you add cooled ganache or chocolate, it will further harden, and there will be chocolate bits in the cream. 

How To Store Eggless Chocolate Mousse

You must store the mousse cake in the refrigerator in an airtight box and consume it within three days. 

You can store the sponge and mousse separately in the refrigerator for a week and assemble them later if required. 

Freezing the mousse cake can increase its shelf life to a month. 

More Easy Recipes

Try out these amazing eggless recipes and enjoy with your loved ones. 

Eggless Pineapple Cake

Eggless Black Forest Cake

Eggless Mango Mousse Cake

Frequently Asked Questions

What is the difference between ganache and mousse?

Ganache is made from cream and chocolate mixed in various ratios, the most common one being equal parts of cream and chocolate. It can be used as a cake filling, icing or glaze, depending on the ratio used to make the ganache. 
A mousse is a dessert made using chocolate, cream, eggs and whipped cream. It’s light and airy in texture and can be served as it is as a dessert or used in cake fillings. 

How to make mousse cake more stable?

Mousse cake requires either gelatine or agar agar for stability. Without any of these setting agents, the mousse will be loose and can melt at room temperature.

Why is my mousse runny?

The mousse can be runny due to a few reasons. One could be that the whipped cream was too soft. When you add ganache to less whipped cream, it will not have the strength to hold the consistency and will loosen. Make sure to beat the cream stiff enough.
Second, overmixing can also lead to runny mousse. Use the cut-and-fold method to mix the ganache into the whipped cream. Mix with light hands and stop mixing as soon as the ganache is combined well. Overmixing will deflate the air from whipped cream.

What is the shelf life of mousse cake? 

You can store a mousse cake for up to 3 days in a refrigerator. 

Is chocolate mousse and pudding the same?

Pudding and mousse are both very different desserts with some similar ingredients. Pudding is a dessert that is thick in texture and much more dense. This is because it is cooked for a long duration using cornstarch. 
On the other hand, mousse is a dessert that is light and airy. It has whipped cream, which gives it an airy texture. 

Can mousse cake be kept out of the refrigerator overnight? 

Mousse cake should be stored in the refrigerator only. Keeping it outside will make the mousse less stable and will reduce its shelf life as well. 

Can I make any other flavour for mousse cake? 

Yes, you can make different flavours here. You can use milk chocolate instead of dark chocolate to make it less bitter and sweeter. White chocolate can also be used to make the mousse. Different fruit puree can be added to white chocolate ganache to make fruit-based mousse. 

What is the difference between mousse cake and truffle cake? 

Chocolate Truffle cake consists of a chocolate sponge and truffle ganache as filling and frosting. On the other hand, Mousse cake has one layer of sponge, a middle layer of mousse and a third layer of ganache. Both have different tastes as well as textures.

How long does it take to set mousse cake in the fridge and freezer?

You need a minimum of 5-6 hours for mousse cake to set in the fridge. It’s recommended to refrigerate overnight. However, if you are in a rush, you can freeze until the mousse sets (approximately 2-3 hours) 

How to fix overmixed mousse/cream?

A common mistake one can make is to over-whip the whipping cream. This can make the cream split. If this is something you have faced earlier, don’t worry; you don’t need to throw away your mousse or whipped cream! Simply add some chilled whipped cream and then slowly mix it in. Add cream a little at a time until you see that the cream does not look broken or split anymore.

Print
clock clock iconcutlery cutlery iconflag flag iconfolder folder iconinstagram instagram iconpinterest pinterest iconfacebook facebook iconprint print iconsquares squares iconheart heart iconheart solid heart solid icon

Eggless Chocolate Mousse Cake

Eggless Chocolate Mousse Cake: Upgrade your chocolate cake-making skills into an elegant dessert with this decadent eggless chocolate mousse cake.

  • Total Time: 95 to 120 minutes

Ingredients

Scale

For Chocolate Cake

  • 63 g All-purpose flour
  • 63 g Castor sugar
  • 6 g Natural cocoa powder
  • 1 g Baking soda
  • 1 g Salt
  • 36 g Refined oil
  • 1 ml Apple cider vinegar
  • 66 ml Whole cream milk
  • 1 ml Vanilla essence

For Mousse

  • 150 g Dark couverture
  • 75 g Fresh cream
  • 4 g Agar agar
  • 225 g Non-dairy whipping cream

For Ganache Layer

  • 80 g Dark couverture
  • 40 g Fresh cream

For Piping

  • Milk chocolate accordingly (melted)

For Dollops Of Mousse

  • 55 g Non-dairy whipping cream
  • 30 g Melted dark chocolate

For Garnish

  • Chocolate balls

Instructions

Method For Sponge

  1. Preheat the oven to 160°C (OTG MODE: upper rod + lower rod + fan). Grease the inside edges of a 6-inch round ring.
  2. In a bowl, take all wet ingredients, i.e., milk, vinegar, oil and vanilla essence.
  3. In another bowl, sift all dry ingredients, i.e., flour, cocoa powder, sugar, salt and baking soda. Give it a stir.
  4. Now, add dry ingredients to the wet ones in batches. Make a smooth batter.
  5. Pour the batter into the prepared ring and bake at 160°C (OTG mode: Lower rod only) for 25-35 minutes.

Method For Chocolate Mousse 

  1. Make the ganache by mixing melted chocolate and warm cream. Add agar agar to it and mix to get a smooth ganache.
  2. Now beat whipping cream till you get soft peaks.
  3. Gradually, Fold the ganache into the whipped cream to make the mousse.

Method For The Top Ganache Layer

  1. Melt chocolate in a microwave.
  2. Warm the cream and pour it into the melted chocolate.
  3. Mix it well to make the ganache.

Method For Mousse Decoration 

  1. Melt the chocolate in a microwave.
  2. Whip the non-dairy whipping cream in a bowl till it achieves soft peaks.
  3. Now, pour melted chocolate (slightly warm) into the beaten, whipped cream.
  4. Transfer this mousse into a piping bag fitted with an open star nozzle.

Method For Assembly

  1. Double cling-wrap 6-inch round ring from one end. Place this ring in a baking tray.
  2. Put the sponge inside the ring. Cut the dome of the cake to make it even from the top.
  3. Cover the inside edge of the ring and around the sponge with acetate sheet or butter paper.
  4. Now, pour the mousse over the sponge. You can tap the tray so that the mousse spreads evenly. Put it in the freezer to set overnight.
  5. Once the mousse is set, pour the chocolate ganache on it and spread evenly.
  6. Put it in the freezer to set for 20-30 minutes.
  7. For the garnish, first pipe melted milk chocolate using a piping bag on the edge. Make around 5 circles.
  8. Now pipe 6 blobs of garnish mousse over the edge at an equal distance.
  9. Finally, place chocolate balls in the middle of two blobs.
  • Author: Chef Mansi
  • Prep Time: 50 to 60 minutes
  • Freeze Time: 20 to 30 minutes
  • Cook Time: 25 to 30 minutes

Leave a Comment

Your email address will not be published. Required fields are marked *

Recipe rating 5 Stars 4 Stars 3 Stars 2 Stars 1 Star

“I achieved 10% of my short-term manifestation before my target date”
Before this program I knew a little about manifestations, but as I discovered during the program, I had a lot of limiting beliefs that kept me from fully embracing and accepting myself as a manifestor.
During this program I became more aware of what manifestation is and how powerful I am. I become more aware of my guides, of my highest self and that I can pull the best of my highest self into my present. Since this program I no longer wrestle with trying to convince myself that what I desire will happen. I know that it has happened, it is done and it is mine, here and now. I achieved 10% of my short-term manifestation before my target date, my eyesight has improved and I no longer need glasses for distance vision, only for reading, I gave myself a make-over as part of my commitment to my renewal and I began to de-clutter my space.
Trevor Buikies
Entrepreneur
Durban, South Africa
“My professional and personal life has seen significant positive changes”
Joining “The Art of Manifesting” was a life-changing decision for me. This is now the third time going through the quest and focusing on different areas of manifestation.
Regan is a powerful guide and she walks the talk.
This 28-day journey was a blend of practical techniques and profound energetical activations. I learned to visualize my goals clearly, expand my possibilities, and overcome the limitations holding me back from living a life i desire. The quest’s unique approach to identity hacking helped me align my inner self with my aspirations, making the manifestation process more effective and authentic.
The biggest takeaway for me was the acceleration of manifestation by bending time and tapping into the highest frequencies. The techniques taught in the quest enabled me to see results much faster than I expected. My professional and personal life has seen significant positive changes, and goals that once seemed unattainable are now within reach.
I’m beyond grateful for the wisdom and tools I’ve gained from this quest and Regan. It’s not just about manifesting; it’s about transforming your entire lifestyle. I highly recommend “The Art of Manifesting” to anyone looking to turn their dreams into reality.
Till Infinity
D
Dijana Llugolli
Coach
Stockholm, Sweden
“This course and listening to Regan’s podcasts gave me the tools to acknowledge my blocks and mindsets around drinking”
I have so enjoyed this journey with Regan, I am a new person as a result of this quest. I now have new beliefs & mindsets that I keep working on daily, hourly. A kinder and more compassionate version of me has emerged over this journey, and I love her!
This quest has resulted in me finding the lost me, the me that has been hidden under the voices of doubt, fear or just lack of awareness that I get to run my life not the other voices in my head or family and people around me. When we wire ourselves to the future version of us, then we make different choices and we are already a different person!
Thank you Regan, thank you Mindvalley, thank you tribe!!!! ❤❤, I love you all and wish you a magical Christmas and hope our paths may cross one day at Mindvalley events.
Rachael Courtenay
Orthopedic Physical Therapist
Royal Tunbridge Wells, United Kingdom
“My family’s net income unexpectedly increased while I was taking the quest”
Before taking this Quest I believed that the prerequisites of success were hard work, long hours, timing and a degree of luck; “1% inspiration and 99% perspiration” was my mantra. Trying to achieve success with this mindset was exhausting, frustrating and unsustainable.


I then discovered The Art of Manifesting … and was blown away.


The foundational teaching of focusing on your inner world to achieve has been transformative in the way I live my life. I now know that cultivating the feeling of already being in possession of that which you want, accelerates the manifestation of what you desire.


My family’s net income unexpectedly increased while I was taking the quest, and have discovered a path to manifest greater abundance in the year to come. But perhaps the biggest shift I experienced during this quest now knowing that I am worthy and deserving of abundance. Regan, I am eternally grateful to you, thank you :-)
Rahim Kassam
Financial Risk Analyst
Toronto, Canada
“Now, my manifestation is showing up right before my eyes in ways I hadn’t even considered”
Before this program, I believed somewhat in manifestation but never knew how to do it, or if it was real, and the little bit I did know ended up being completely wrong! This Quest has not only taught me how to manifest and put me on the path to doing it the right way, but I was actually able to manifest what I had set at the beginning.
I never thought it would actually come true, but I committed myself to the process and gave it 100% every day. And now, my manifestation is showing up right before my eyes in ways I hadn’t even considered. It’s truly blowing my mind.
I had a financial goal for the end of the Quest, and different opportunities for selling my artwork started coming up, and the deals are coming out almost to the exact number I had set.
Not only that, but I have truly transformed into a better version of myself in these short weeks, more than I had in the last few years, that my spouse has even noticed.
I’m so excited for what’s to come next and so grateful for this program. Thank you.
Hannah McGuire Silva
Artist
Olney, United States
“I have written a 50,000-word book, that is now in design”
I joined Mindvalley on New Year’s 2023. I am excited to share how life has significantly changed in the first 90 days of the year. Beginning with the Silva Method, I envisioned and transformed a dysfunctional personal relationship, into a loving, caring separation, allowing me the peace and serenity to follow my path, and my partner to choose his. In February while on the Art of Manifesting Quest I listed my intent to have a book written by May 2023, and have a speaking engagement booked by December 2023.
I have written a 50,000-word book, that is now in design, and a journal for Women seeking a deeper connection with themselves, also in design. Both will be uploaded via KDP Amazon self-publishing by May 1st.
I have booked a speaking engagement for May with the intent of having published books with me for sale.
Most importantly – this morning I changed my profile from ‘Document writer’ to ‘Author.’
Gratitude abounds!!!
Sharr L
Author
Kelowna, Canada