fbpx

Tiramisu Cake Recipe

Home » Tiramisu Cake Recipe

Tiramisu Cake Recipe

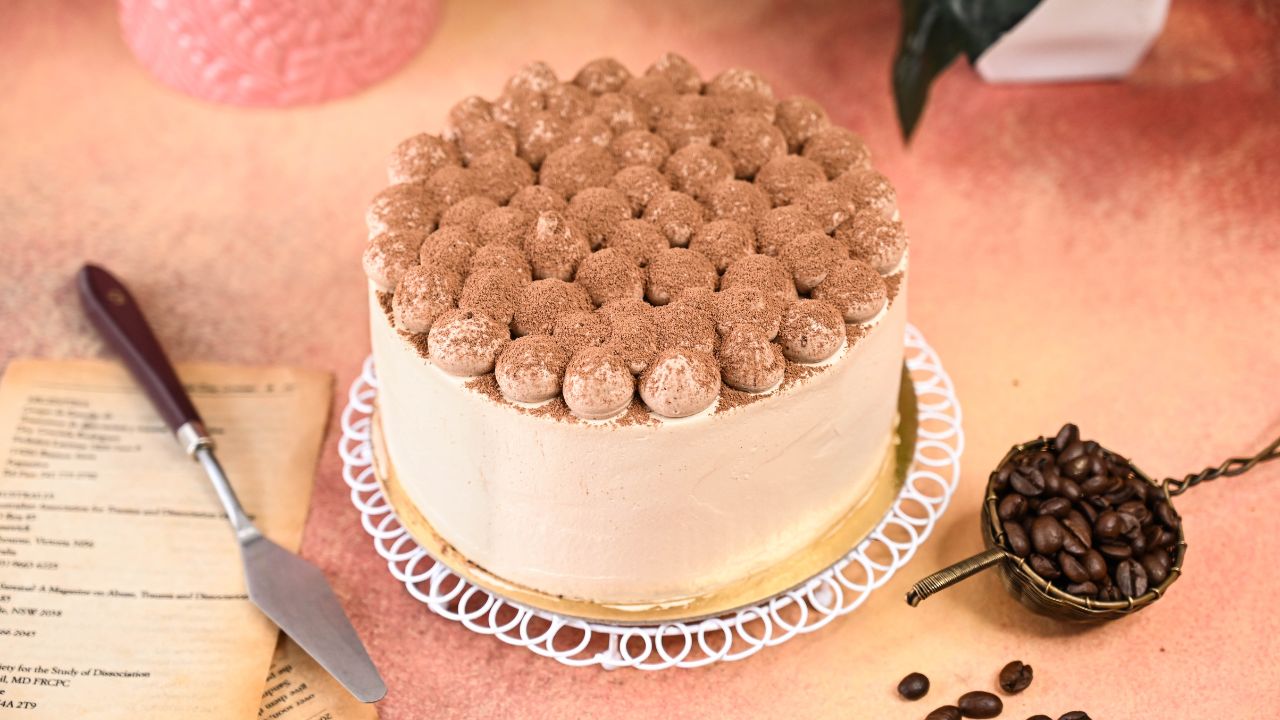
It’s hard not to love a creamy, light slice of tiramisu, and when it is turned into a cake, it’s irresistible. While the classic version has captivated our taste buds for decades, the spin-off version of Tiramisu takes it to new heights. This luscious Italian delicacy combines a delicate sponge soaked in coffee, velvety mascarpone frosting, and a dusting of cocoa powder to create a symphony of flavors that touches your heart. It is a match made in heaven for coffee lovers.

The classic Italian Tiramisu uses ladyfingers as a cake base, but this cake version is so much better. You will definitely love the way the sponges absorb coffee.

If you are unfamiliar, Tiramisu is an Italian dessert, where lady fingers cookies dipped in espresso and layered with mascarpone cheese frosting and dusted with cocoa powder on top. Preparing a Tiramisu cake requires precision and care, and through this recipe, you will achieve all these.

Why You Will Love This Recipe?

  • Taste: this cake combines the flavor of espresso, mascarpone cheese, and cocoa powder, which gives the cake a rich flavor. Combining these flavors makes the creamy, sweet, and slightly bitter taste that compliments the overall taste profile.
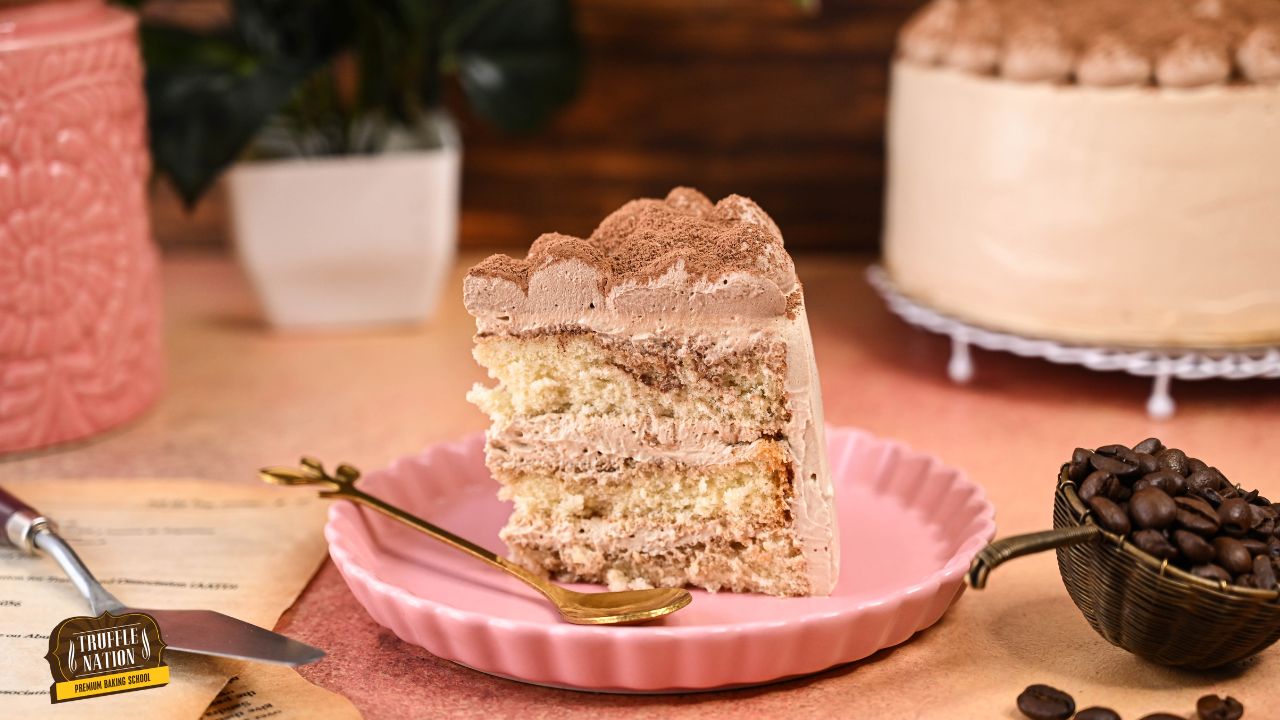
  • Texture: this cake has a beautiful soft texture that adds to its appeal. The layer of soft sponge soaked in espresso or coffee spread with sweet and creamy mascarpone cheese frosting. Combining these textures creates a delightful contrast between the soft, airy sponge and the rich, velvety frosting.
  • Coffee-infused goodness: Tiramisu Cake is a dream come true if you are a coffee lover. This cake is typically infused with coffee or espresso that imparts deep and aromatic coffee flavor throughout each bite. And that makes the cake perfect for those who love the coffee’s deep and distinct flavor.
  • Classic dessert: it is an Italian classic dessert that is loved by many. Its enduring taste speaks for itself, making it a dessert loved by people of all ages.
  • Great to make ahead dessert: Tiramisu cake is a type of cake that gets better with time. The flavor melds together, and the texture gets even more luscious after some time in the refrigerator. This makes the cake perfect for parties or gatherings, as you can make it ahead and let the flavors develop.  

Important Ingredients Used In The Recipe

  • Mascarpone cheese: this smooth and creamy cheese is one of the star ingredients of making Tiramisu cake. It is combined with other ingredients to create a rich, luscious, and velvety frosting used as a filling.
  • Coffee or espresso: coffee is the other star ingredient of the recipe. The vanilla sponges are soaked to give the cake a bold flavor. It is a dream come true dessert for those who love coffee.
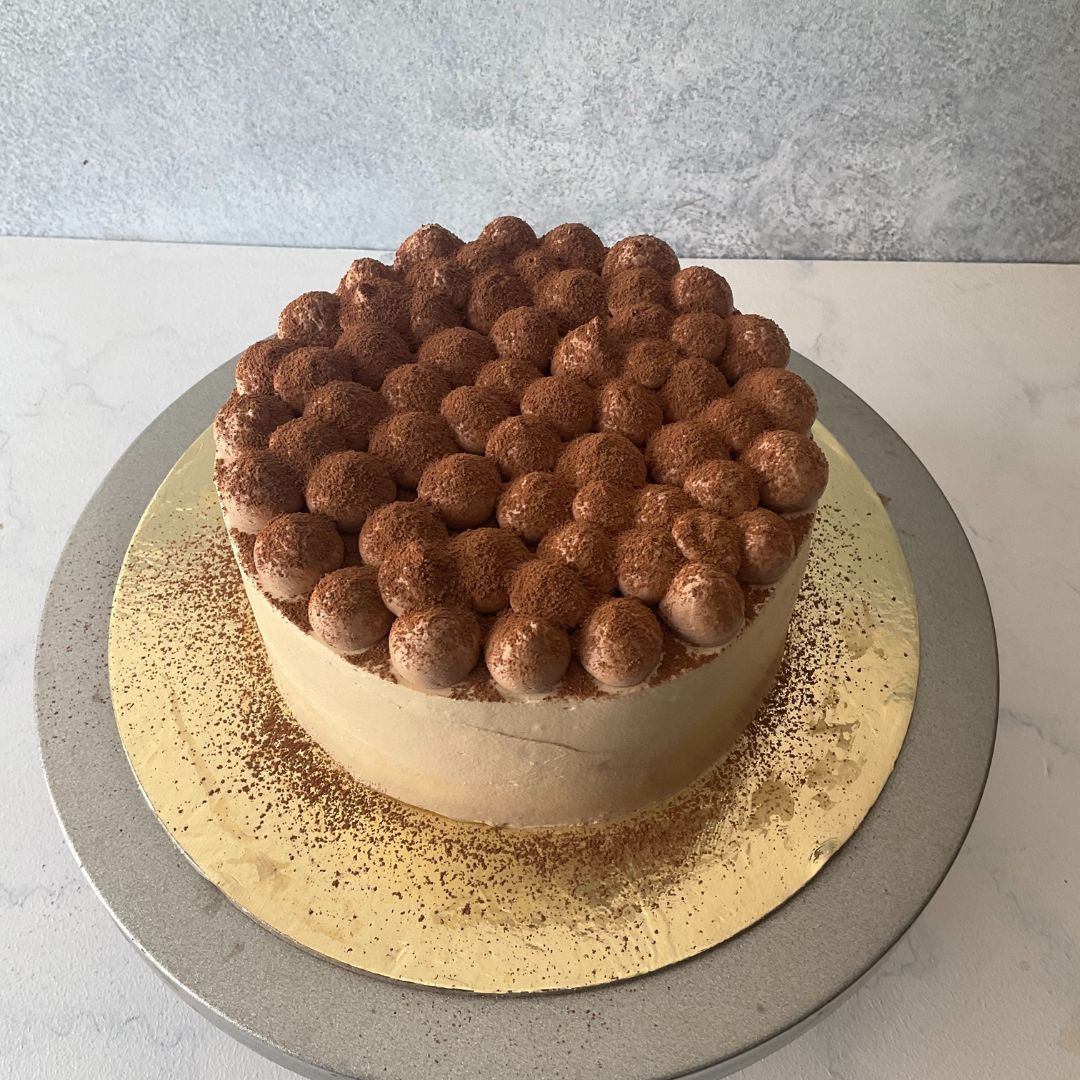
  • Cocoa powder: cocoa powder is traditionally used to dust on top of the tiramisu dessert. For dusting, I have used natural cocoa powder. It adds a bittersweet flavor to the cake and enhances the visual appeal.
  • Sugar: sugar is the essential ingredient in making a sponge as it is beaten with eggs to make the eggs fluffy.
  • Eggs: Eggs are used in the making of the vanilla sponges. In this recipe, I have beaten the eggs with an electric hand beater then the dry ingredients are folded into them. This way, we get an airy and soft textured sponge. 
  • Cornflour: I have used cornflour to make the sponge tender and soft. It is a gluten-free ingredient that makes the cake more tender.

How To Make Tiramisu Cake

For complete instructions and the quantity of the ingredients, see the recipe box.

For Sponge Batter

Preparation: preheat the oven to 180°C or 350°F (OTG mode: upper rod + lower rod + fan). Prepare two 6-inch round baking tins by brushing a tiny amount of oil and placing butter paper at the bottom. This step ensures that the sponge doesn’t stick to the tin.

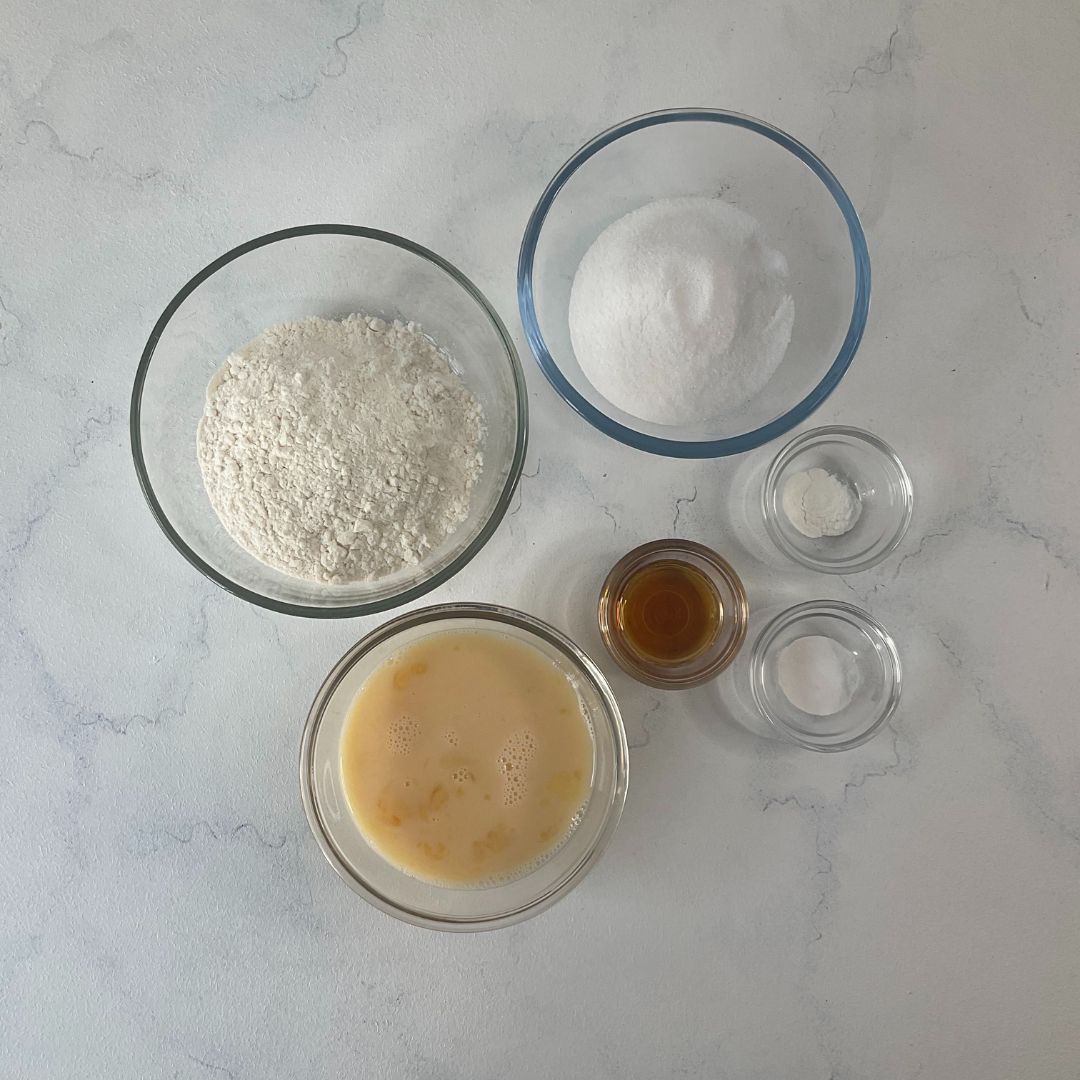
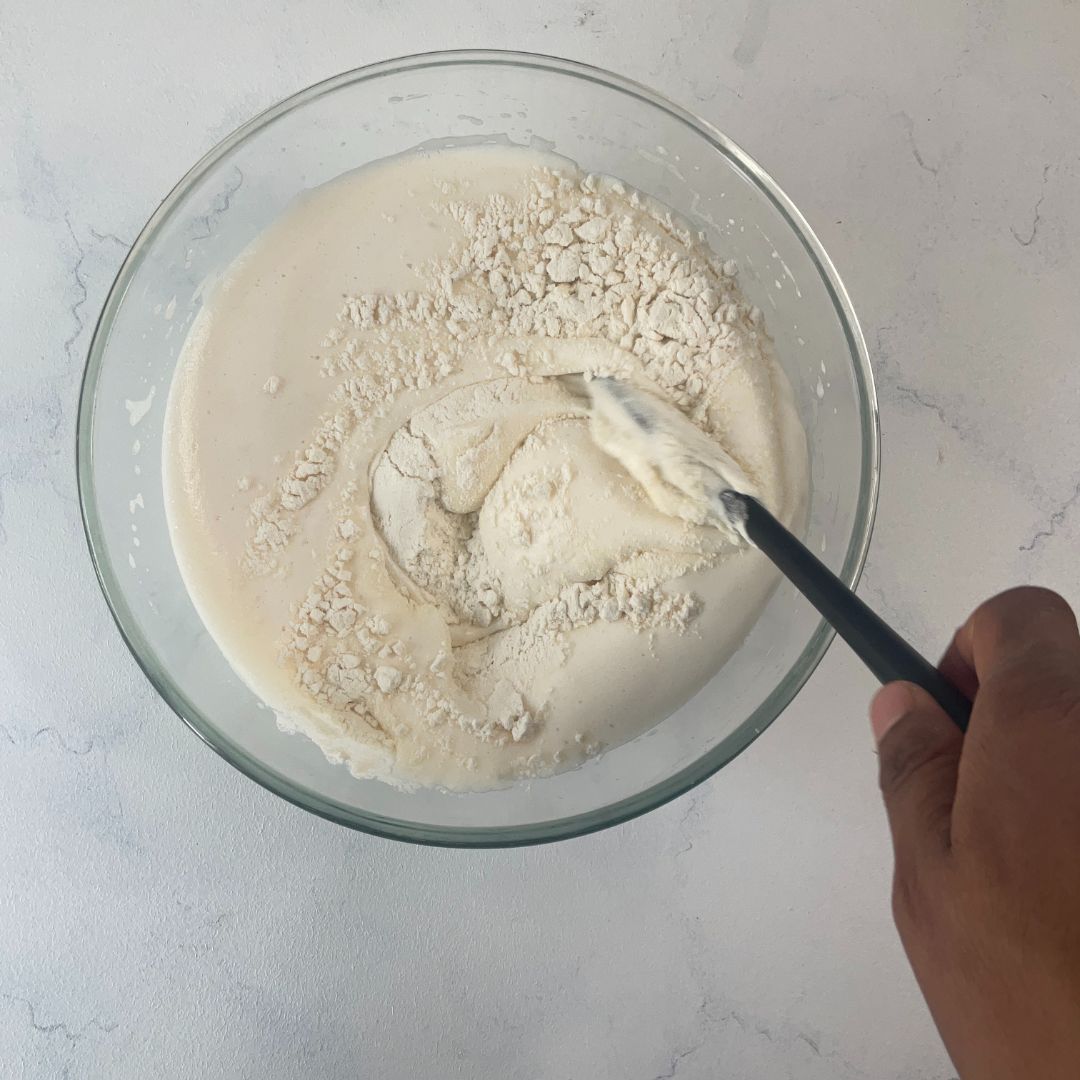
Sift Dry Ingredients: in a bowl, sift all-purpose flour, cornflour, and baking powder together and keep it aside. Sifting the dry ingredients prevents the formation of lumps.

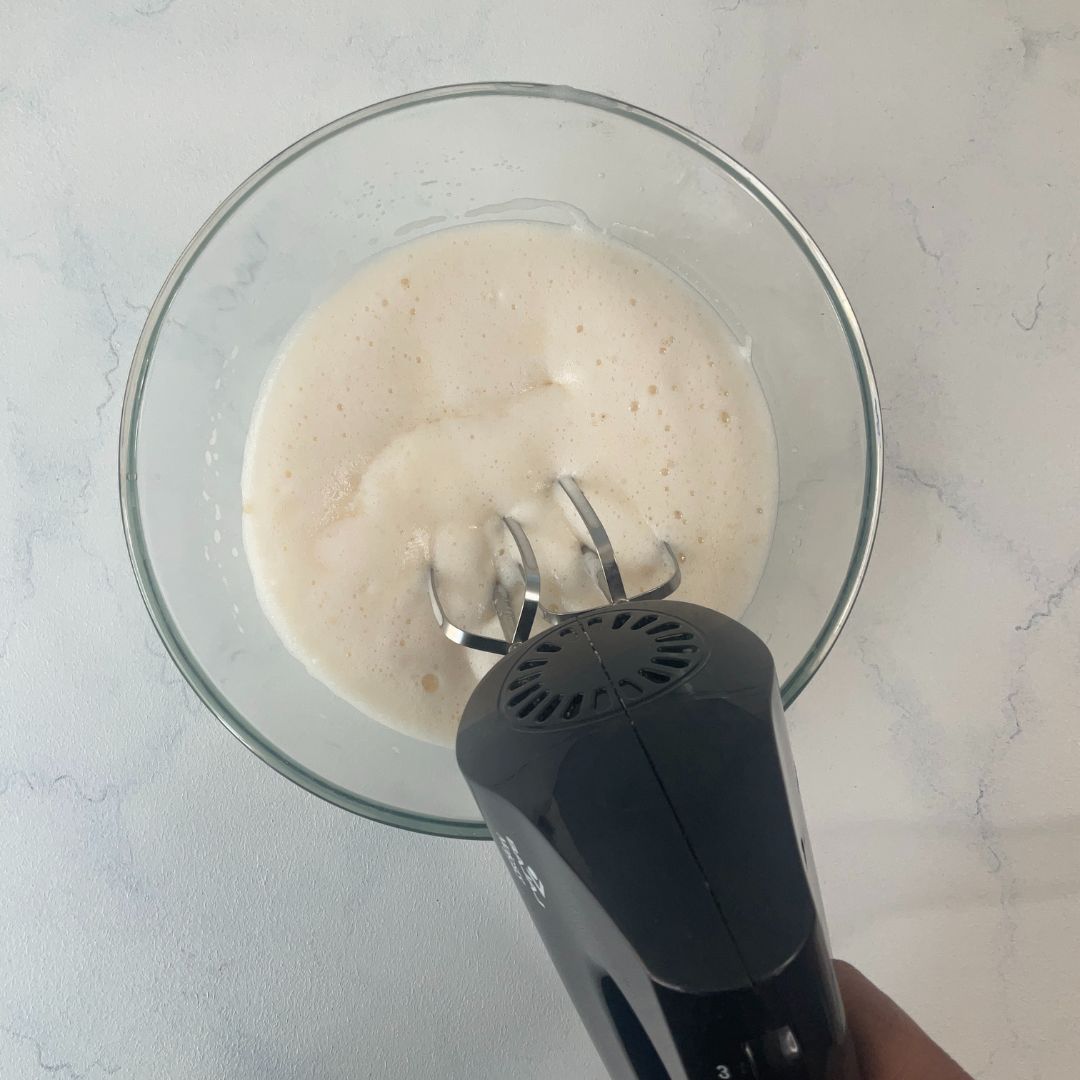
Beat Eggs and Sugar: in a big bowl, beat eggs until they become foamy, then add in sugar and beat again until you get a soft and fluffy meringue-like texture. This is crucial in making the sponge soft and airy, so you must beat it properly.

Add Dry Ingredients: now, fold the dry ingredient gently into the egg mixture using the cut-and-fold method. If you vigorously mix the dry ingredients, it may flatten the fluffy egg mixture. So, make sure that you gently fold the ingredients. Ensure that there are no lumps in the batter.

Bake: transfer 1/3rd of the batter into a tin, then the rest to the other tin. Bake them at 180°C or 350°F (OTG mode: lower rod only) for 30 minutes. You can check whether the sponge is baked by touching it on the top. It should be firm enough and not jiggly.

Cool: After baking, let them cool down completely before unmoulding them.

For the Coffee Reduction

Brew Coffee: in a saucepan, brew water and crushed coffee beans for 3-5 minutes.

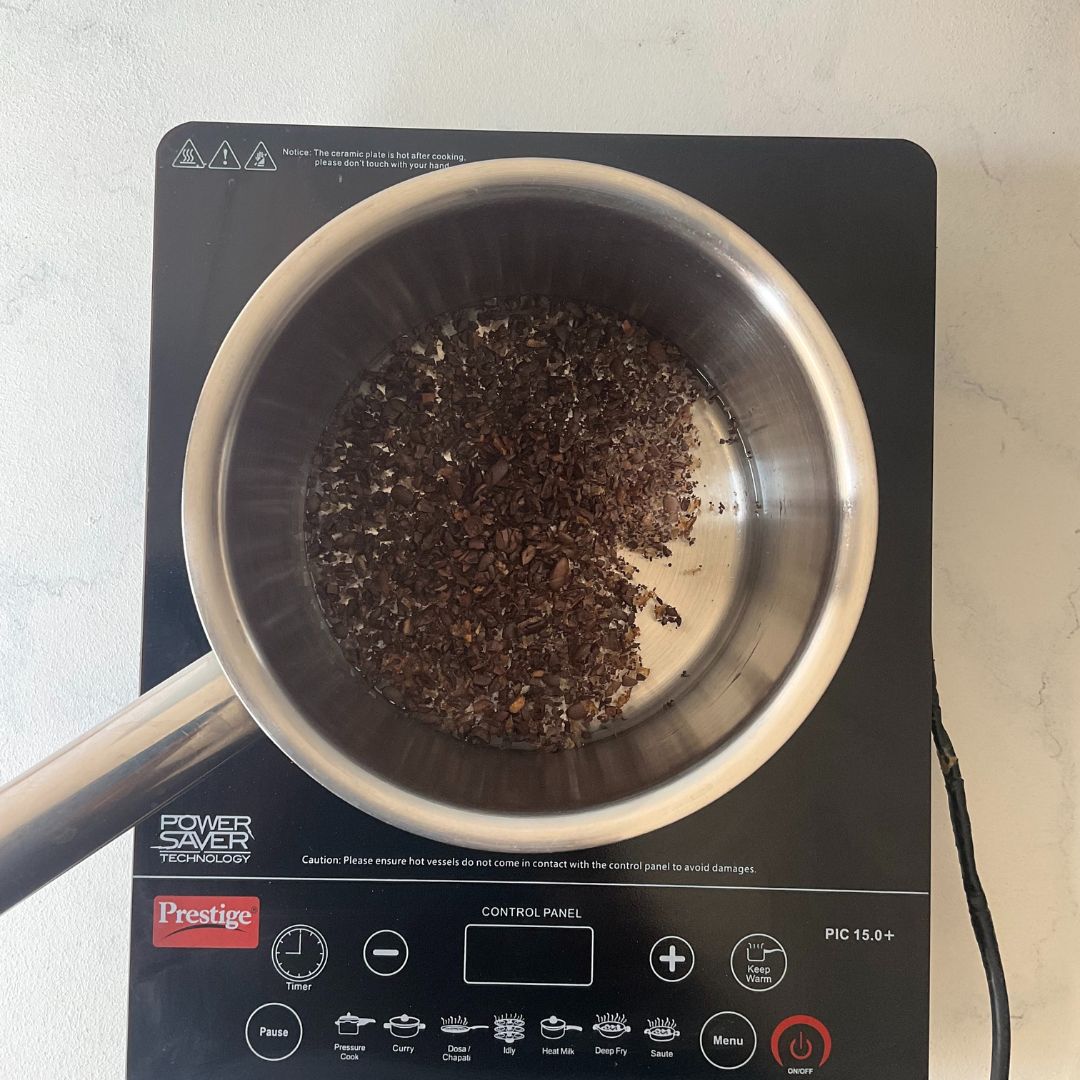
Strain The Reduction: strain the freshly brewed coffee reduction and keep it aside. Using coffee beans rather than instant coffee makes it give a bolder flavor.

For Mascarpone Cheese Frosting

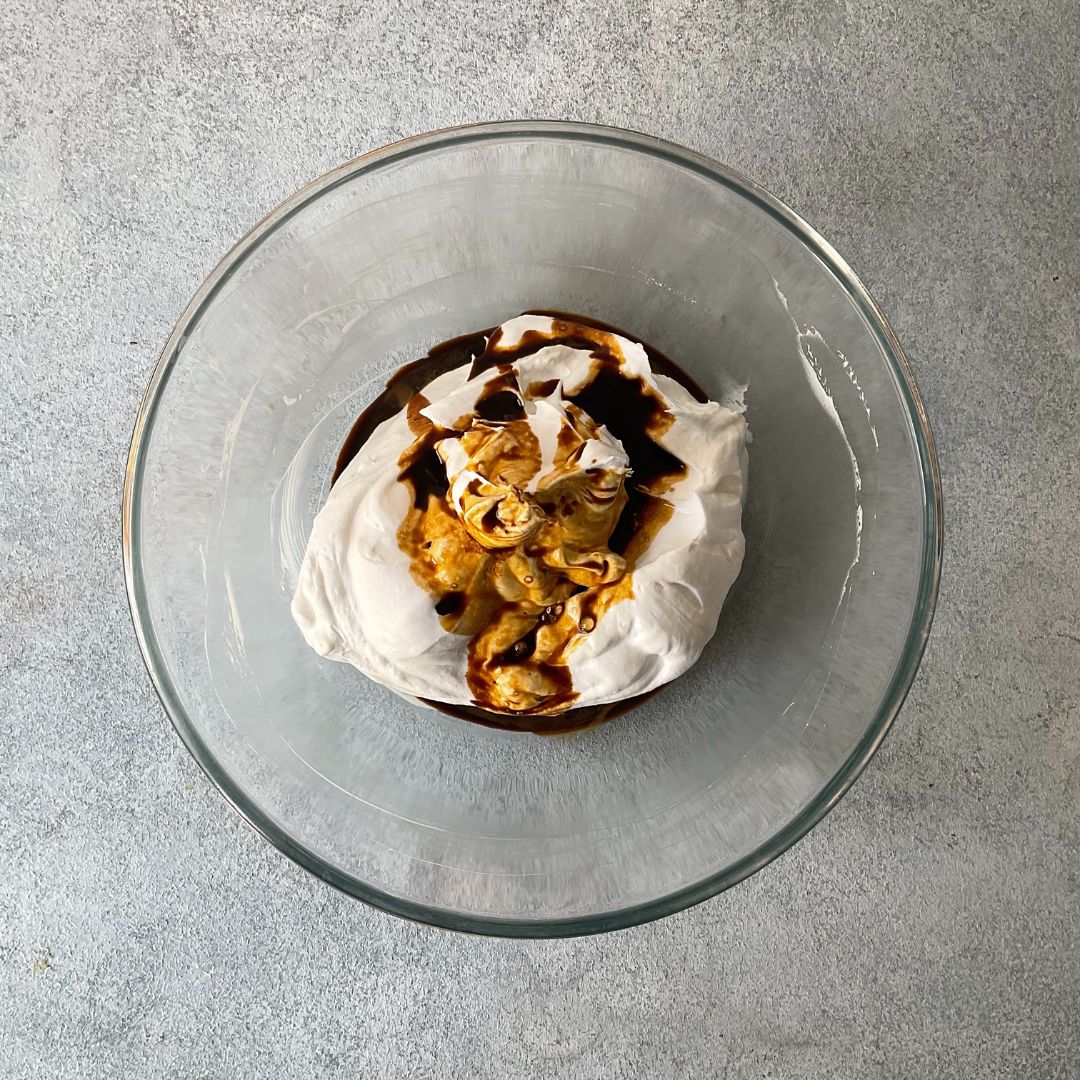
Soften The Mascarpone: soften the mascarpone cheese in a bowl, then keep it aside. Do not use an electric hand beater to soften it, as it may curdle the cheese.

Make Coffee Syrup: mix coffee with warm water, and let it cool down completely before adding it to the frosting, or it may melt the frosting a bit.

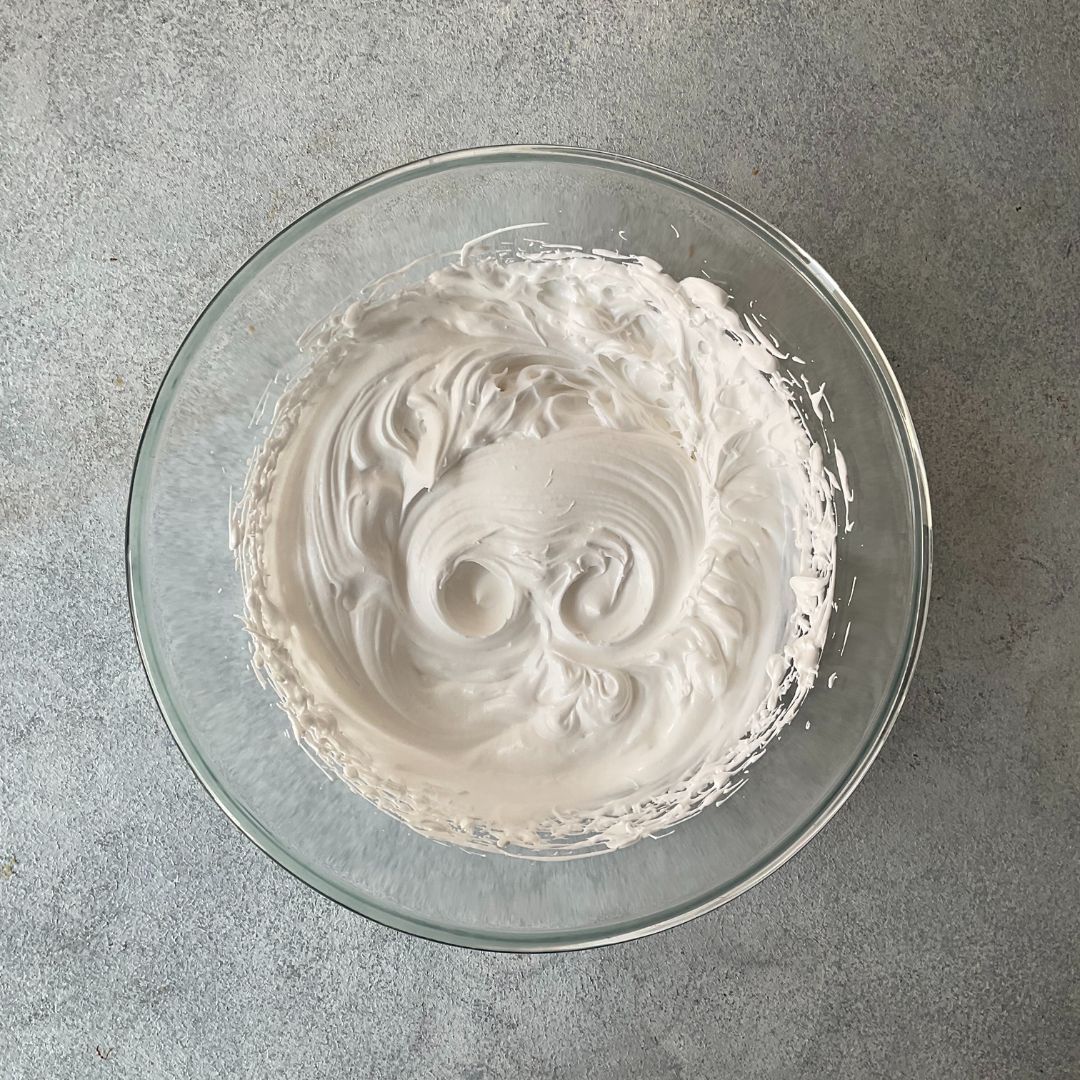
Beat Whipping Cream: in a different bowl, whip whipping cream with an electric hand beater until a stiff peak is achieved. A stiff peak is mandatory because when we fold in the mascarpone cheese, it will come to soft peaks, making it easier to frost the cake.

Fold the Mascarpone Cheese: With the help of a silicon spatula, fold in the softened mascarpone cheese along with the coffee essence.  

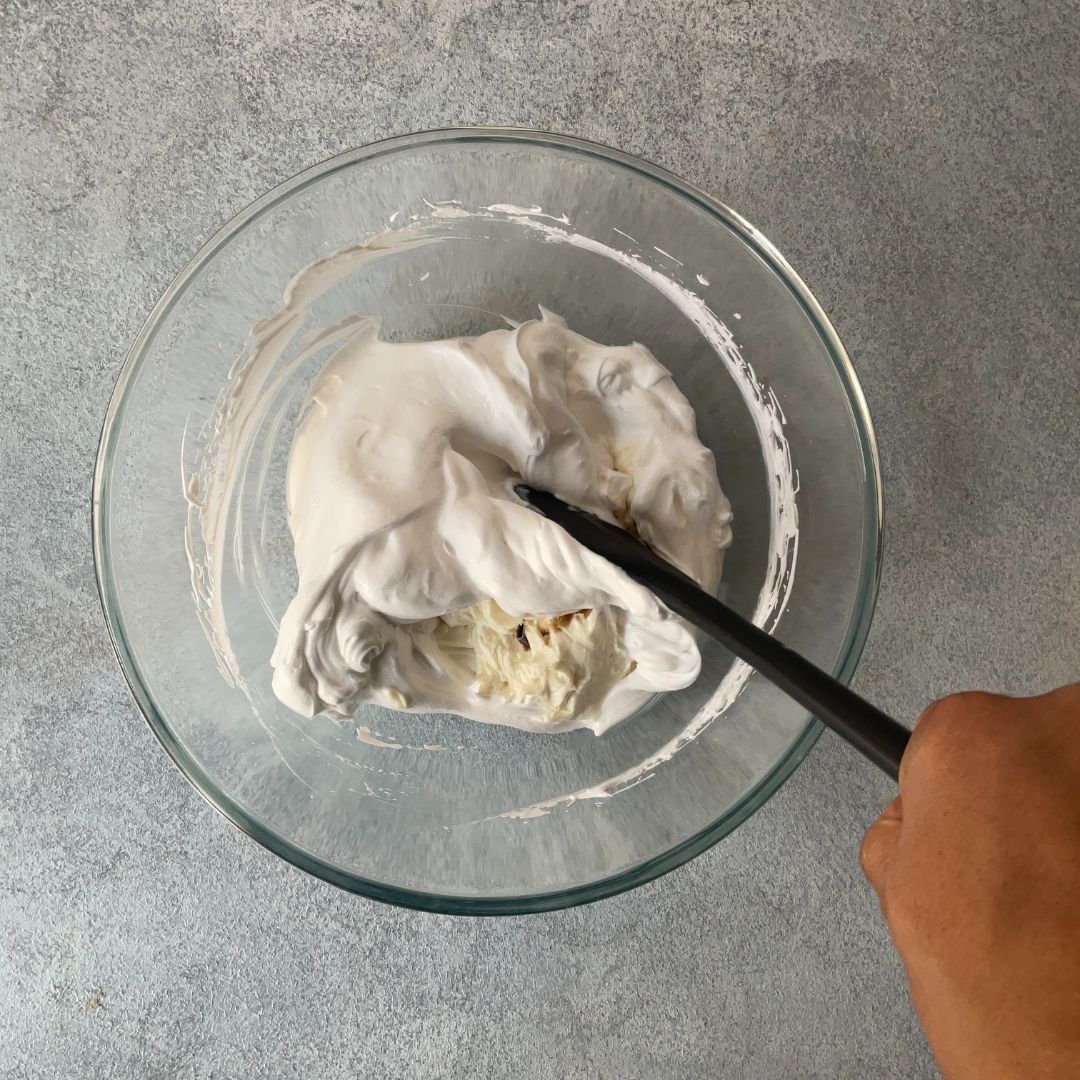
Add Coffee Syrup: Lastly, mix the coffee with the frosting and beat again for a few seconds.

Assembly of the Cake

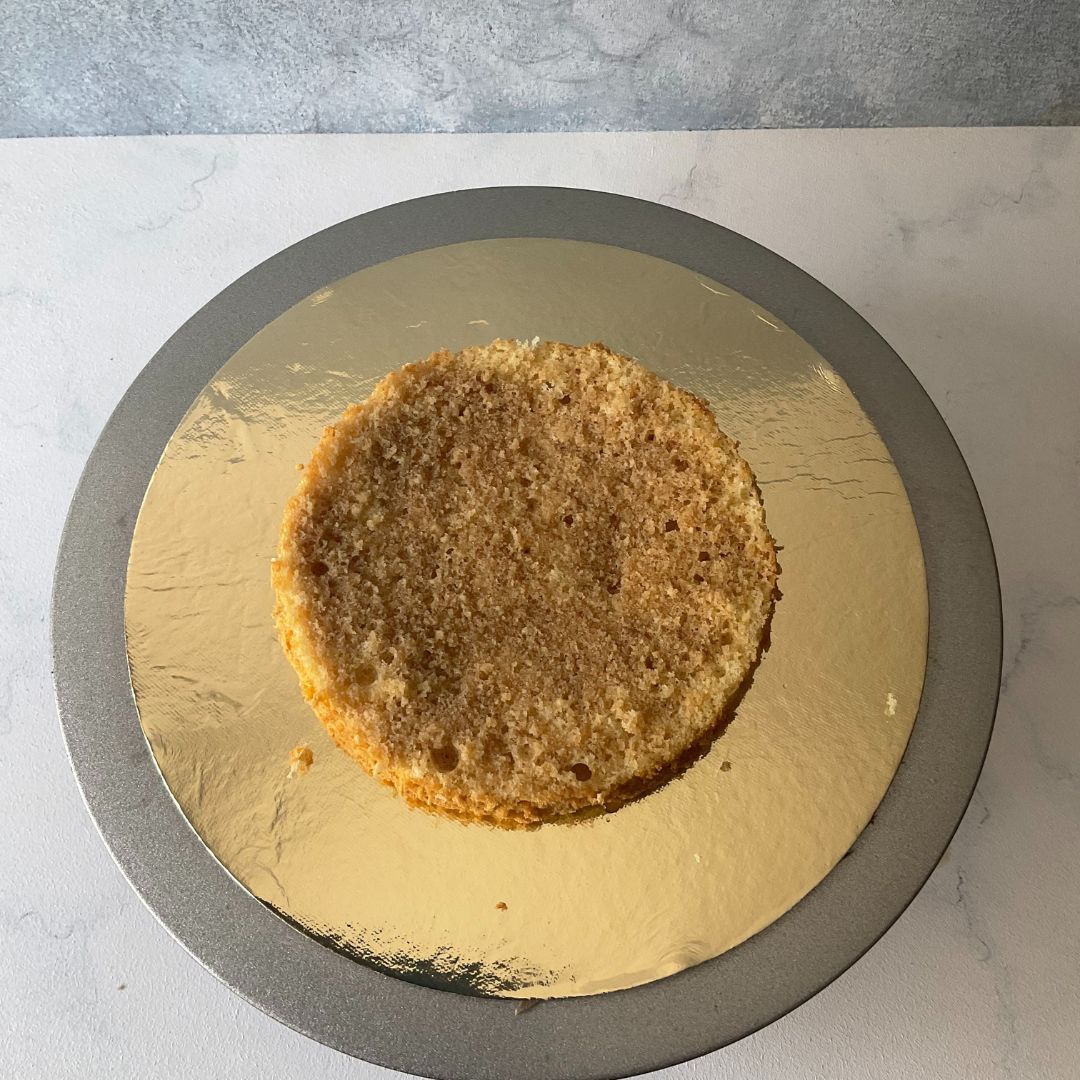
Make Sponge Layers: de-mould the cake carefully. And divide the sponge that is taller into two halves.

Assemble First Layer: Place a cake base over a turn table and spread a small amount of frosting on top so that our cake sticks to one place. Place one layer of the sponge, then soak it with coffee reduction using a pastry brush; make sure not to oversoak it. Layer it with the mascarpone frosting.

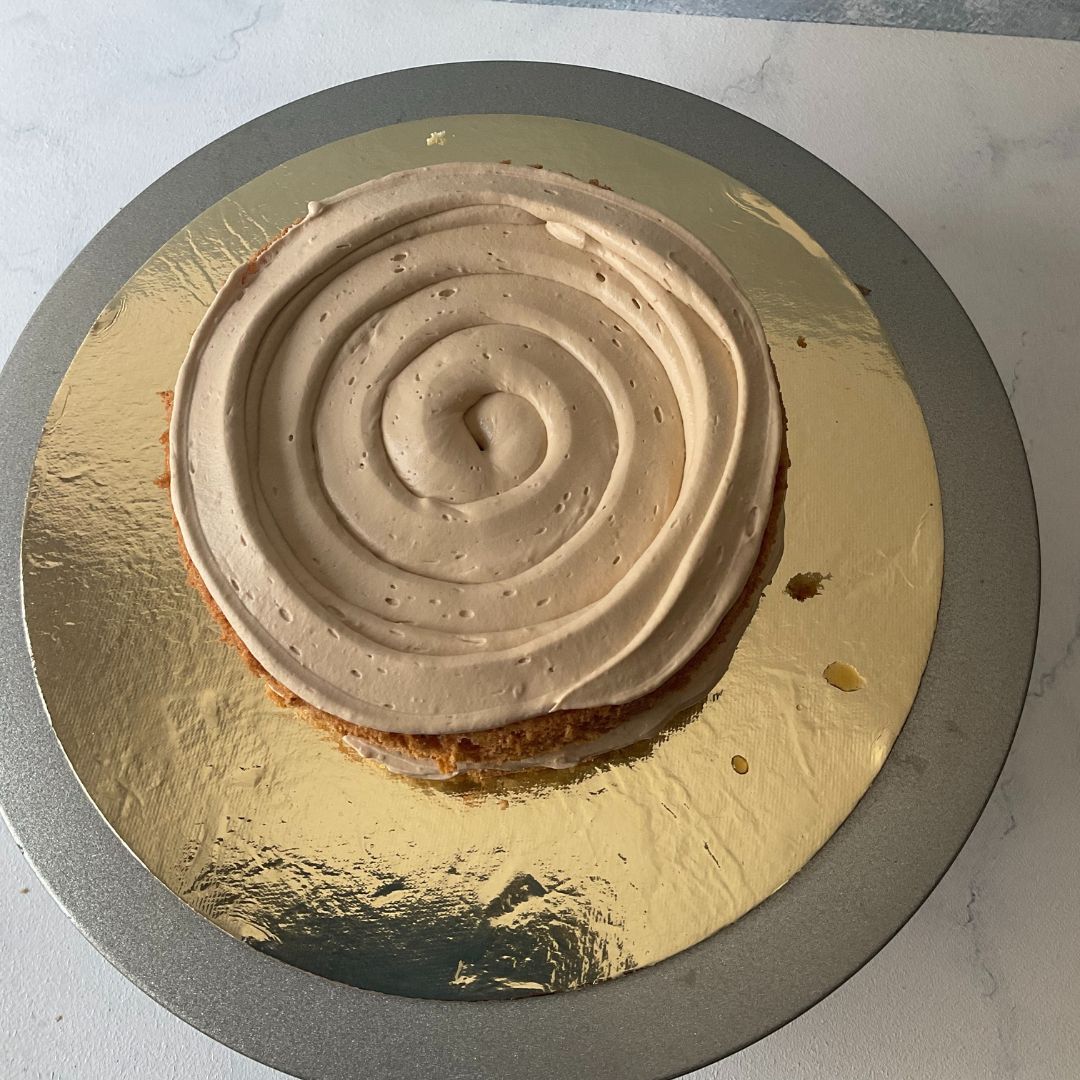
Assemble the rest of the Layers: Place another sponge on top. Then again, soak the sponge with coffee reduction and repeat the same process as before until we get three layers of sponges. Be sure to do soaking the top layer as well.

Crumb Coat: crumb coat the cake with a thin layer of frosting. Remove the excess with a scrapper. Crumb coating is essential as it keeps the stray crumbs in place and helps in the final coating of the cake.

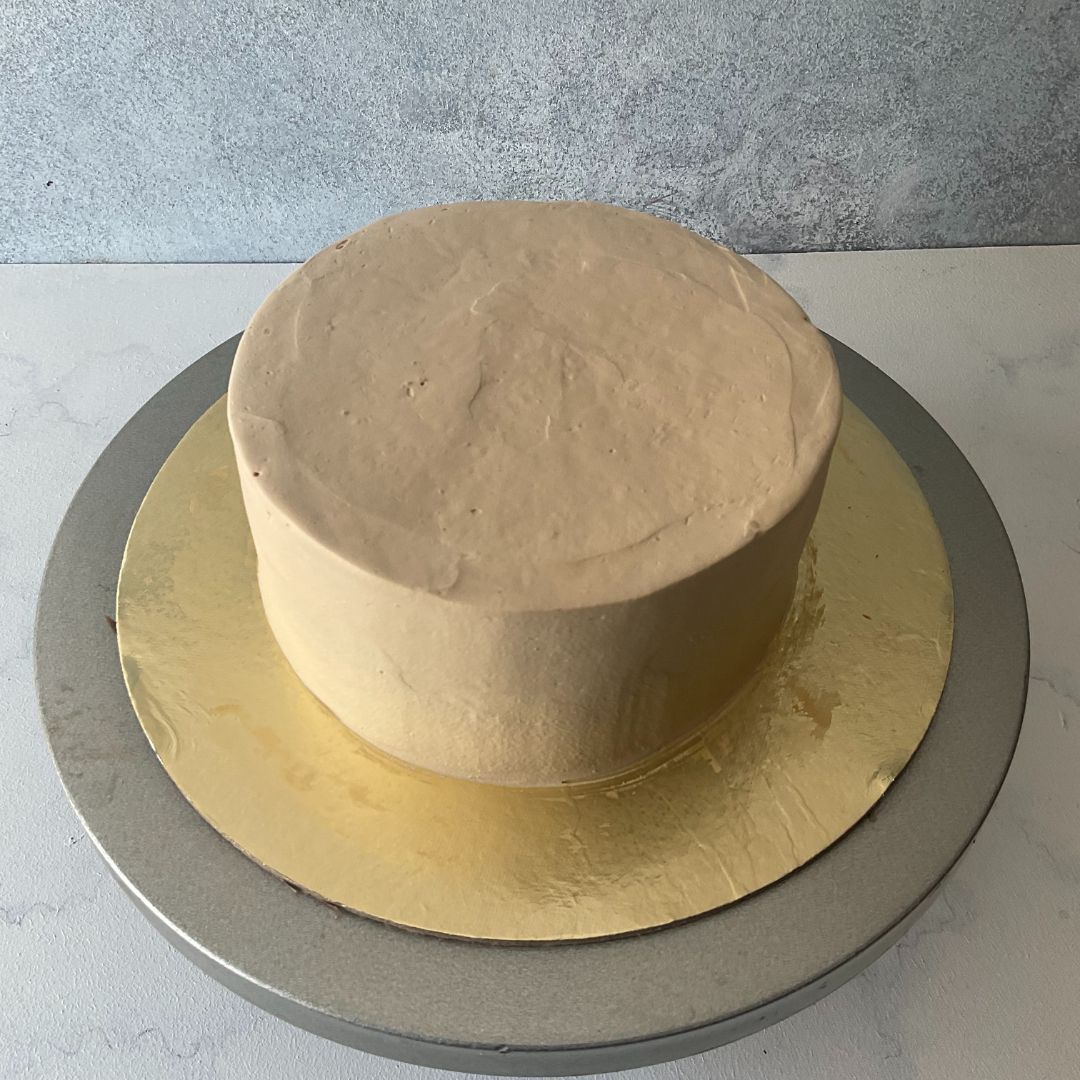
Freeze: After crumb coating, keep it in the fridge for about 15 minutes.

Final Coating: after 15 minutes, give the cake its final coating, pipe thick layers of frosting. And using a palette knife or scrapper, smooth it out.

Decoration: now, for decorating the cake, pipe dollops of the frosting on top using a round nozzle. Dust cocoa powder on top of the dollops at last.

Chef’s Tip For The Recipe

Tip For Mascarpone

Mascarpone cheese should use cold and right after taking it out of the fridge. Make sure to soften the mascarpone cheese with a spatula, not an electric beater, as it tends to curdle fast. Use high-quality mascarpone cheese to make the frosting.

Tip For Sponge Batter

To make the sponge, beat the eggs properly until a fluffy texture is achieved. Do not over-mix the batter while mixing dry ingredients into the eggs, as it can deflate the air present in the eggs resulting in a tight sponge. Do not tap the tin after pouring the batter, as the air present in the batter can collapse.

How To Store Tiramisu Cake

For Frosted Cake

After frosting, keep it in the freezer for about 4-5 hours, then cover it with plastic wrap twice. This way, it can be stored for up to 1 month. Thaw it in the refrigerator and pipe dollops of the frosting on top, then dust with cocoa powder before serving. It can be stored in the fridge for up to 2 days. If you keep it for more than two days, the sponge will start soaking moisture from the frosting, and the frosting will dry up.

For the Sponges

After baking, let them cool down completely. Remove the butter paper from the bottom, then wrap it in food-grade plastic wrap. You can store it in the freezer for 1-2 months. Thaw them in the refrigerator before frosting them.

More Easy Recipe

if you like this recipe, I’m sure you like our other freshly curated recipes.

Eggless mango cake

Oreo cake

French Vanilla Cake

Frequently Asked Questions

What is a Tiramisu Cake?

Tiramisu is a dessert that originated in Italy. It is traditionally made with lady fingers soaked in coffee, layered with mascarpone cheese filling, and dusted with cocoa powder on top. But in this recipe, I have transformed it into a cake.

What does Tiramisu Cake taste like?

It tastes just like the coffee-infused Italian dessert but in a cake form.

Can I substitute mascarpone cheese in the recipe?

While mascarpone cheese is traditionally used to fill tiramisu, you substitute it with cream cheese or only whipping cream.

Can I make Tiramisu Cake in advance?

Yes, you can make tiramisu cake in advance. It tastes even better if you chill it before serving.

Can I make tiramisu cake without eggs?

Yes, you can make Tiramisu Cake without eggs. You just have to make the eggless version of the vanilla sponge.

Print
clock clock iconcutlery cutlery iconflag flag iconfolder folder iconinstagram instagram iconpinterest pinterest iconfacebook facebook iconprint print iconsquares squares iconheart heart iconheart solid heart solid icon

Tiramisu Cake Recipe

The classic Italian Tiramisu uses ladyfingers as a cake base, but this cake version is so much better. You will definitely love the way the sponges absorb coffee.

  • Total Time: 75 to 90 minutes

Ingredients

Scale

For Sponge:

  • 87g All-Purpose Flour
  • 84g Castor Sugar
  • 188g Eggs
  • 1/4 + 1/8 Tsp + pinch Baking Powder
  • 1/8 Tsp + pinch Corn flour
  • 3 Tsp Vanilla Essence

For Coffee Reduction

  • 10g Crushed Coffee Beans
  • 150ml Water

For Mascarpone Cheese Frosting

  • 120g Mascarpone Cheese
  • 200g Whipping Cream (Non-dairy)
  • 7g Instant Coffee
  • 28g Warm Water
  • 1/8 Tsp Coffee Essence

For Garnish

  • Cocoa Powder As Required

Instructions

For Sponge

  1. Prepare the baking tins by brushing the oil and placing the butter paper at the bottom.
  2. Preheat the oven to 180°C or 350°F (OTG mode: upper rod + lower rod + fan)
  3. In a bowl, sift the dry ingredients, which are all-purpose flour, cornflour, and baking powder, then keep it aside.
  4. In a different bowl, beat eggs until foamy, add castor sugar and vanilla essence, and beat again until the mixture is light and fluffy.
  5. Now fold in the sifted dry ingredients gently by using the cut-and-fold method.
  6. Once the dry ingredients are properly mixed, pour them into the prepared tins. Pour it in such a way that one tin has 1/3 of the batter and the other one has 2/3 of the batter.
  7. Bake them at 180°C or 350°F (OTG mode: lower rod only) for about 30 minutes.
  8. After baking, let them cool down completely.

For Coffee Reduction


  1. In a saucepan, add water and crushed coffee beans, then brew it for 3-5 minutes.
  2. Strain the coffee reduction and let it cool down.

For Mascarpone Frosting

  1. Soften the mascarpone cheese with a spatula
  2. Mix coffee and warm water in a bowl, then keep it aside.
  3. Whip whipping cream until a stiff peak is achieved.
  4. Fold in mascarpone cheese and coffee essence.
  5. Lastly, add coffee and give it a final mix.

Assembly:

  1. De-mould the sponges with the help of a bent palette knife.
  2. Divide the taller sponge into two parts with the help of a cake leveler
  3. Place a cake base on a turn table and apply some frosting on it.
  4. Place the first layer of the sponge, then soak it with coffee reduction with the help of a silicon brush.
  5. Now apply some of the frosting, then smooth it out using a palette knife. Place the second layer of sponge on top.
  6. Repeat the same process with the second layer as well. Soak the last layer of sponge as well.
  7. Apply a thin layer of frosting all over the cake.
  8. Smooth the frosting using a palette knife or a scrapper for clean edges. Remove the excess frosting.
  9. Keep the crumb-coated cake in the fridge for about 15 to 20 minutes.
  10. After 15 minutes, remove the cake from the fridge, apply a thick layer of frosting all over it, and smooth it out.
  11. Now using a round nozzle pipe, dollops of frosting on top of the cake. Dust cocoa powder on top of the dollops.


  • Author: Chef Mansi Jain
  • Prep Time: 15 minutes
  • Assembly Time: 30-40 minutes
  • Cook Time: 30 to 35 minutes

Leave a Comment

Your email address will not be published. Required fields are marked *

Recipe rating 5 Stars 4 Stars 3 Stars 2 Stars 1 Star

“I achieved 10% of my short-term manifestation before my target date”
Before this program I knew a little about manifestations, but as I discovered during the program, I had a lot of limiting beliefs that kept me from fully embracing and accepting myself as a manifestor.
During this program I became more aware of what manifestation is and how powerful I am. I become more aware of my guides, of my highest self and that I can pull the best of my highest self into my present. Since this program I no longer wrestle with trying to convince myself that what I desire will happen. I know that it has happened, it is done and it is mine, here and now. I achieved 10% of my short-term manifestation before my target date, my eyesight has improved and I no longer need glasses for distance vision, only for reading, I gave myself a make-over as part of my commitment to my renewal and I began to de-clutter my space.
Trevor Buikies
Entrepreneur
Durban, South Africa
“My professional and personal life has seen significant positive changes”
Joining “The Art of Manifesting” was a life-changing decision for me. This is now the third time going through the quest and focusing on different areas of manifestation.
Regan is a powerful guide and she walks the talk.
This 28-day journey was a blend of practical techniques and profound energetical activations. I learned to visualize my goals clearly, expand my possibilities, and overcome the limitations holding me back from living a life i desire. The quest’s unique approach to identity hacking helped me align my inner self with my aspirations, making the manifestation process more effective and authentic.
The biggest takeaway for me was the acceleration of manifestation by bending time and tapping into the highest frequencies. The techniques taught in the quest enabled me to see results much faster than I expected. My professional and personal life has seen significant positive changes, and goals that once seemed unattainable are now within reach.
I’m beyond grateful for the wisdom and tools I’ve gained from this quest and Regan. It’s not just about manifesting; it’s about transforming your entire lifestyle. I highly recommend “The Art of Manifesting” to anyone looking to turn their dreams into reality.
Till Infinity
D
Dijana Llugolli
Coach
Stockholm, Sweden
“This course and listening to Regan’s podcasts gave me the tools to acknowledge my blocks and mindsets around drinking”
I have so enjoyed this journey with Regan, I am a new person as a result of this quest. I now have new beliefs & mindsets that I keep working on daily, hourly. A kinder and more compassionate version of me has emerged over this journey, and I love her!
This quest has resulted in me finding the lost me, the me that has been hidden under the voices of doubt, fear or just lack of awareness that I get to run my life not the other voices in my head or family and people around me. When we wire ourselves to the future version of us, then we make different choices and we are already a different person!
Thank you Regan, thank you Mindvalley, thank you tribe!!!! ❤❤, I love you all and wish you a magical Christmas and hope our paths may cross one day at Mindvalley events.
Rachael Courtenay
Orthopedic Physical Therapist
Royal Tunbridge Wells, United Kingdom
“My family’s net income unexpectedly increased while I was taking the quest”
Before taking this Quest I believed that the prerequisites of success were hard work, long hours, timing and a degree of luck; “1% inspiration and 99% perspiration” was my mantra. Trying to achieve success with this mindset was exhausting, frustrating and unsustainable.


I then discovered The Art of Manifesting … and was blown away.


The foundational teaching of focusing on your inner world to achieve has been transformative in the way I live my life. I now know that cultivating the feeling of already being in possession of that which you want, accelerates the manifestation of what you desire.


My family’s net income unexpectedly increased while I was taking the quest, and have discovered a path to manifest greater abundance in the year to come. But perhaps the biggest shift I experienced during this quest now knowing that I am worthy and deserving of abundance. Regan, I am eternally grateful to you, thank you :-)
Rahim Kassam
Financial Risk Analyst
Toronto, Canada
“Now, my manifestation is showing up right before my eyes in ways I hadn’t even considered”
Before this program, I believed somewhat in manifestation but never knew how to do it, or if it was real, and the little bit I did know ended up being completely wrong! This Quest has not only taught me how to manifest and put me on the path to doing it the right way, but I was actually able to manifest what I had set at the beginning.
I never thought it would actually come true, but I committed myself to the process and gave it 100% every day. And now, my manifestation is showing up right before my eyes in ways I hadn’t even considered. It’s truly blowing my mind.
I had a financial goal for the end of the Quest, and different opportunities for selling my artwork started coming up, and the deals are coming out almost to the exact number I had set.
Not only that, but I have truly transformed into a better version of myself in these short weeks, more than I had in the last few years, that my spouse has even noticed.
I’m so excited for what’s to come next and so grateful for this program. Thank you.
Hannah McGuire Silva
Artist
Olney, United States
“I have written a 50,000-word book, that is now in design”
I joined Mindvalley on New Year’s 2023. I am excited to share how life has significantly changed in the first 90 days of the year. Beginning with the Silva Method, I envisioned and transformed a dysfunctional personal relationship, into a loving, caring separation, allowing me the peace and serenity to follow my path, and my partner to choose his. In February while on the Art of Manifesting Quest I listed my intent to have a book written by May 2023, and have a speaking engagement booked by December 2023.
I have written a 50,000-word book, that is now in design, and a journal for Women seeking a deeper connection with themselves, also in design. Both will be uploaded via KDP Amazon self-publishing by May 1st.
I have booked a speaking engagement for May with the intent of having published books with me for sale.
Most importantly – this morning I changed my profile from ‘Document writer’ to ‘Author.’
Gratitude abounds!!!
Sharr L
Author
Kelowna, Canada