fbpx

Butterscotch Cake Recipe

Home » Butterscotch Cake Recipe

Butterscotch Cake Recipe

I present you with the ultimate eggless butterscotch cake. I remember the first time I tried the butterscotch cake; let me tell you, it was pure bliss. And from that moment, it has stuck to my taste buds. I often used to go to the same bakery shop to have that exact cake over and over again. And today, I tried to bring the same taste with this butterscotch cake made from scratch. With its luscious butterscotch sauce and velvety sponge, I am sure it will also capture your heart, just like it captured mine.

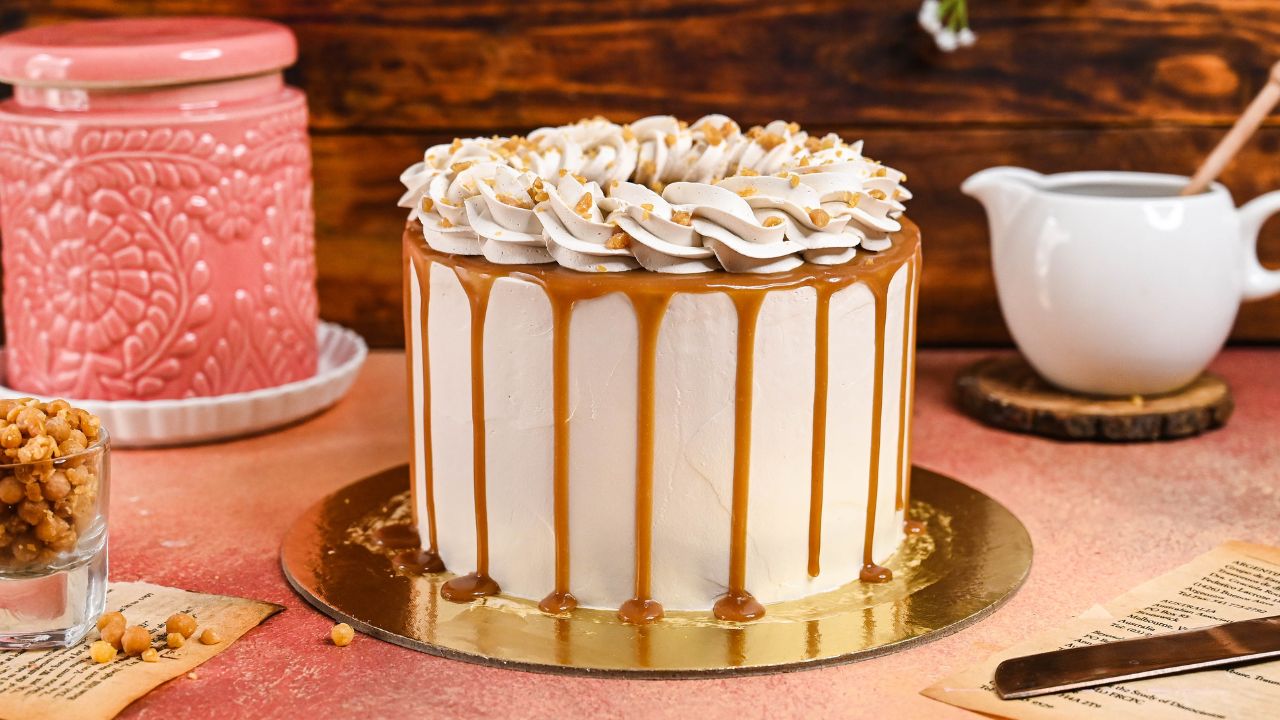
If you are one of those people who doesn’t know what a Butterscotch Cake is and what it tastes like. Let me answer it in one word, and that is ‘HEAVEN’. This butterscotch cake has a tender and moist sponge, homemade butterscotch sauce, and butterscotch frosting topped with butterscotch nuts and drip. It’s the perfect cake for gifting to your loved ones or for any given occasion. And I am sure everyone in your family will give you many positive compliments for this cake. 

Why You Will Love This Recipe?

There are many reasons to love this recipe for Butterscotch Cake, and I have listed some of them below:

  • Butterscotch: This homemade butterscotch sauce is the ultimate reason to love this recipe. It is easy and simple to make. It has been added to the frosting, used as a drip and has been added in between layers for lots of flavours. 
  • Flavour: This recipe imparts the ultimate flavour of Butterscotch Cake. Rich and decadent, this cake offers a unique butterscotch flavour through the homemade butterscotch sauce. The combination of sweet and slightly salty flavours creates a distinct taste, making it a delightful treat for people with sweet tooth and non-sweet lovers.
  • Texture: this cake has all the elements of a perfect cake. Smooth and creamy frosting with light and tender sponge layers, resulting in a cake that is so satisfying to bite into.
  • Homemade goodness: while you can find a butterscotch cake in any bakery shop, there is something exceptional about making it at home. The process of making it at home is a reward in itself. And the end result is both satisfying and delicious. And homemade cakes are always far healthier than store-bought ones as you select the ingredients that are fresh and high in quality. 
  • Crowd Pleaser: butterscotch cake is generally loved by all, making it perfect for any occasion. This cake’s familiar and comforting taste can make your loved ones ask for more. 

Important Ingredients Used In The Recipe:

  • Brown sugar: it is one of the key ingredients used in making homemade butterscotch sauce. The molasses present in it provide the distinct flavour of butterscotch and colour to the sauce. 
  • Butter: in this recipe, butter has been used in the sponge and butterscotch sauce. It creates a rich, tender and soft crumb of the sponge. It also adds richness and sheen to the butterscotch sauce. 
  • Corn flour: to make the sponge soft and tender, I added a little corn flour to the batter. 
  • Buttermilk: I have substituted egg with buttermilk since it is an egg-free cake. It works wonders, providing a soft, moist, fluffy texture to the sponge.
  • Salt: salt is added to enhance the butterscotch sauce’s distinct flavour. 
  • Vanilla Essence: this ingredient has been used in almost all of the elements of this cake. Even for making soaking syrup, I have used vanilla essence. Vanilla essence gives the cake a lovely aroma.

How To Make The Butterscotch Cake?

For complete instructions and the quantity of the ingredients, see the recipe box.

Preparation: collect and weigh all the ingredients correctly before starting. Preheat the oven to 180°C or 350° (OTG mode: lower rod + upper rod + fan), grease two 6-inch round baking tin with oil, and line it with butter paper at the bottom.

For homemade butterscotch sauce: 

Place Ingredients in Saucepan: in a heavy-bottom saucepan, add all the ingredients that are brown sugar, butter, fresh cream, salt and vanilla essence. 

Cook: let it simmer and bring it to a boil while stirring occasionally until it thickens. 

Cool: transfer it to a bowl and let it cool down before using it in the element.

For sponge

Buttermilk: make instant buttermilk by mixing apple cider vanilla with the milk and keep it aside to curdle. You can also use store-bought plain buttermilk if you have one. Apple cider vinegar gives the buttermilk more flavour than synthetic white vinegar. 

Mix Butter And Sugar: add melted butter and icing or powdered sugar in a bowl and cream them using an electric hand beater until fully incorporated and the mixture is pale and fluffy. It should take around 3-4 minutes. 

Add Dry Ingredients: sift the dry ingredients in the same bowl and mix with a spatula. You will see a crumb-like texture.

Add Buttermilk: Gradually add buttermilk in parts and mix properly to make a smooth, lump-free batter.

Bake: Transfer the batter into the baking tins equally and bake them at 180°C or 350° (OTG mode: lower rod) for 30-35 minutes or until a toothpick inserted in the middle comes out clean with a few crumbs sticking.

For Frosting

Whip Cream and Butterscotch Sauce: make sure both butterscotch sauce and whipping cream are cold before mixing. Add whipping cream and butterscotch sauce in a big bowl, then start whipping with an electric hand beater until a soft peak is achieved. Transfer it to piping bags and set aside.

Assembly

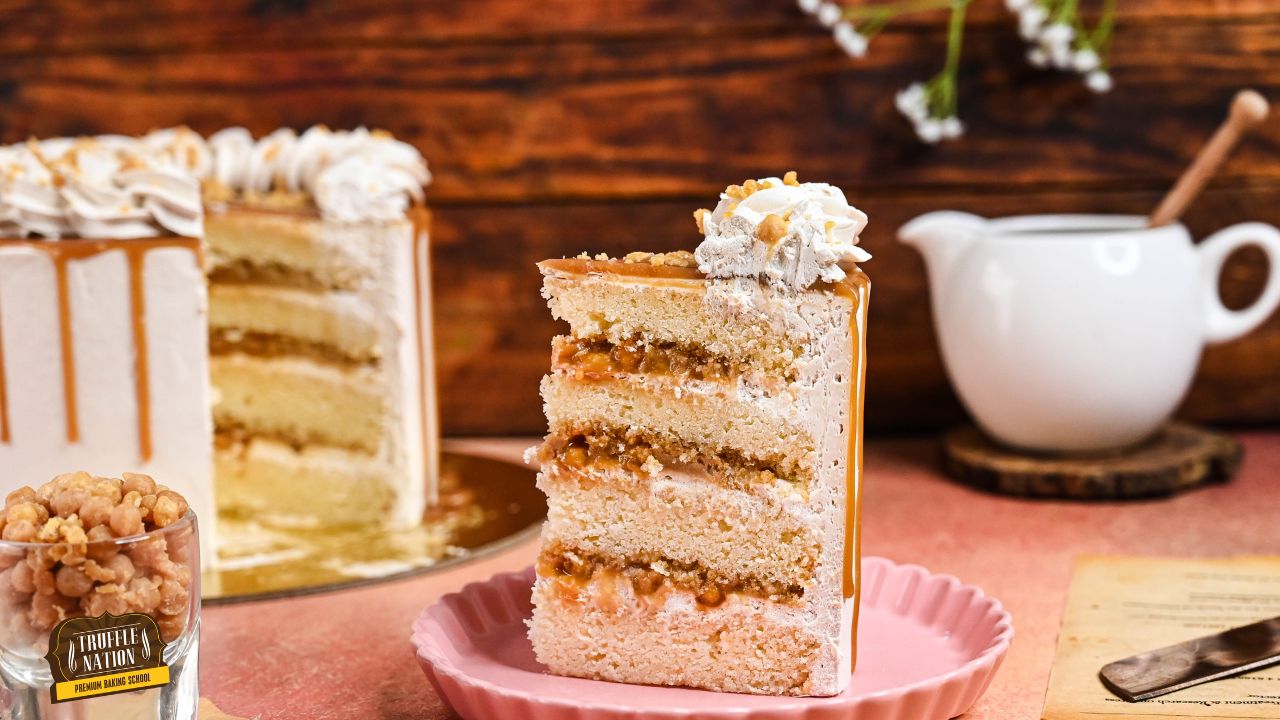
De-mould the Sponge: before starting the assembly, de-mould the cake and divide the sponges into two parts using a cake leveller. Using a cake leveller will help you in getting even layers of sponges. 

Assemble First Layer: Place a cake base on a turn table and spread a little bit of frosting so that our cake doesn’t budge from the place while layering and frosting. 

Soak and Frost: now place a sponge layer and soak with soaking syrup using a pastry brush. Pipe some frosting through a pipe and smooth it with a palette knife. On top of the frosting, spread some of the butterscotch sauce and sprinkle butterscotch nuts. 

Assemble Rest Of The Layers: place another layer of sponge and repeat the same with the rest of the layers.

Crumb-coat: For crumb-coating the cake, pipe a thin layer of frosting and smooth it out using the same palette knife. Remove the excess with a scrapper. Crumb coating helps the stray crumbs to stay in place, resulting in a smooth final coat. So, make sure you do not skip on crumb coating the cake.

Freeze: after crumb coating, keep in the fridge for about 15-20 minutes so that the frosting sets a little and helps in the final coating.

Final Coating: After 15 minutes, give the crumb-coated cake its final coating by piping thick layers of frosting all over it and smoothing it out.

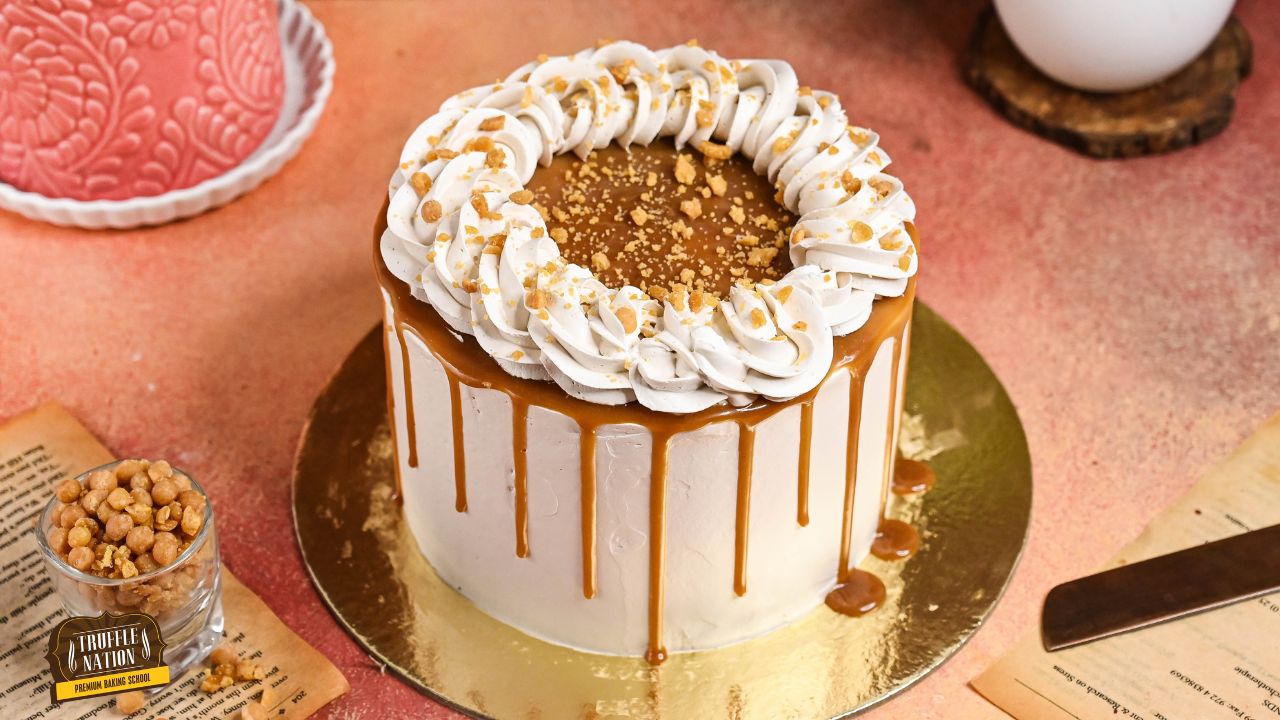
Decorate: now, on top, spread the butterscotch sauce and give a drip effect by piping it through a piping bag. Pipe spirals on the top edge of the cake using a 1M nozzle. Sprinkle crushed butterscotch nuts on top as well. 

Chef’s Tip For The Recipe

Tip For Creaming

Cream melted butter and icing sugar properly. Beat them until a light and fluffy texture is achieved. This process results in a tender cake.

Add Buttermilk In Batches

While adding buttermilk, make sure you add it in parts. This will help you in mixing the ingredients easily.

Tip for Butterscotch Sauce

While making butterscotch sauce, make sure not to stir vigorously, or the brown sugar will crystallize. 

While making the frosting, ensure the butterscotch sauce is cold and not warm; otherwise, the whipping cream won’t whip correctly.

How To Store Butterscotch Cake?

To store the frosted cake, keep it in an airtight container inside the fridge, or the frosting will dry out. It can be stored in a refrigerator for up to 3 days.

It can be stored at room temperature for 1 day as it is a fully frosted cake.

You can freeze the frosted cake as well. Make sure that you keep it in an airtight container.

The baked sponge can be stored in the fridge for up to 2 weeks, while in the freezer, it can be stored for up to 1 month. 

The butterscotch sauce can be stored in the fridge for up to 1 month. While for frosting, it can be stored in the refrigerator for one week.

Frequently Asked Questions

What is the crucial ingredient that gives the butterscotch cake its distinct flavour?

The key ingredient that gives the butterscotch cake its distinct flavour is a butterscotch sauce made with brown sugar. Its caramel-like flavour provides a rich, buttery and slightly nutty flavour to the cake.

Can I make the butterscotch sauce with castor sugar instead of brown sugar?

Using castor sugar will alter the flavour of butterscotch sauce, making it a regular caramel. 

What type of frosting goes best with butterscotch cake?

Although butterscotch buttercream is preferred in making a butterscotch cake, I have used whipping cream to frost it to make it light. You can also use caramel or simple vanilla frosting to frost the cake.

Can I freeze the butterscotch cake?

Yes, you can freeze the butterscotch cake. Ensure you keep it in an air-tight container so the frosting doesn’t get dried out.

Why did my sponge for butterscotch sauce sink from the middle?

It may be due to over mixing of the batter. Or you have added too much sugar or oil. Ensure you add the exact quantity in the recipe and do not over-mix the batter.

Print
clock clock iconcutlery cutlery iconflag flag iconfolder folder iconinstagram instagram iconpinterest pinterest iconfacebook facebook iconprint print iconsquares squares iconheart heart iconheart solid heart solid icon

Butterscotch Cake Recipe

This butterscotch cake has a tender and moist sponge, homemade butterscotch sauce, and butterscotch frosting topped with butterscotch nuts and drip. It’s the perfect cake for gifting to your loved ones or for any given occasion. And I am sure everyone in your family will give you many positive compliments for this cake.

  • Total Time: 75 to 95 minutes

Ingredients

Scale

For Sponge:

  • 246g All-Purpose Flour
  • 21g Corn Flour
  • 1/4 + 1/8 Tsp Baking Soda
  • 1 + 1/2 Tsp Baking Powder
  • 180g Icing Sugar
  • 1 Tsp Vanilla Essence
  • 145g Melted Butter
  • 393 ml Milk
  • 2 Tsp Apple Cider Vinegar

For Butterscotch Sauce:

  • 160g Brown Sugar
  • 120g Salted Butter
  • 200g Fresh cream
  • 2 Tsp Vanilla Essence
  • 1/8 Tsp Salt

For Frosting:

  • 450g Whipping Cream
  • 100g Butterscotch Sauce

For Garnish:

  • Butterscotch Nuts As Required

Instructions

For Sponge:

  1. Preheat the oven to 180C (OTG mode: upper rod + lower rod + fan). Grease two 6-inch round cake tins with oil and line them with butter paper. 
  2. Sift together all-purpose flour, corn flour, baking powder, and baking soda in a bowl.
  3. In another bowl, cream together melted butter and icing sugar.
  4. Add vanilla essence to the creamed mixture and mix.
  5. Add in the sifted dry ingredients and mix well.
  6. Now add buttermilk in parts. Combine everything well and make a smooth batter.
  7. Pour the batter into the prepared tins equally.
  8. Bake in preheated oven at 180C (OTG mode: lower rod only) for 30-40 minutes or until a toothpick inserted in the centre comes out clean.

For Butterscotch Sauce:

  1. Add all the ingredients in a heavy-bottom saucepan, i.e., brown sugar, salted butter, fresh cream, salt, and vanilla essence.
  2. Bring the mixture to a boil and keep stirring. 
  3. Let the sauce simmer until it starts to thicken.
  4. Butterscotch sauce may take a few minutes to thicken, but to check for thickness, dip the back of a spoon in the sauce, and if it sticks to the spoon, it’s ready to be removed from heat.
  5. Transfer it to a bowl and let it cool down.

For Frosting:

  1. Add whipping cream and butterscotch sauce in a bowl, then beat them until a soft peak is achieved.

  2. Transfer it to piping bags and keep it aside for further use.

For Assembly:

  1. De-mould the cake from the tin with the help of a bent palette knife.
  2. Divide the sponges into two parts using a cake leveller.
  3. Now on the cake base, spread some frosting so that our cake doesn’t budge while layering or frosting.
  4. Now place a sponge layer and soak it with soaking syrup using a pastry brush. 
  5. Pipe frosting on top and smooth it out. Now spread some butterscotch sauce and sprinkle butterscotch nuts on top.
  6. Place another layer of sponge and repeat the same process until we get four layers of sponges. Soak the top layer as well. 
  7. For crumb coating, pipe thin layers of frosting all over the cake, smooth out using a palette knife and remove the excess with a scrapper.
  8. Keep it in the freezer for about 15-20 minutes. 
  9. After 15 minutes, remove the crumb-coated cake from the fridge and start piping frosting all over the cake for final coating.
  10. Now spread butterscotch sauce on top and give a drip effect, using 1M nozzle pipe spirals on the top edge of the cake. 
  11. Lastly, sprinkle crushed butterscotch nuts on top.
  • Author: Chef Mansi Jain
  • Prep Time: 15 minutes
  • Assembly Time: 30-40 minutes
  • Cook Time: 30 to 40 minutes

Leave a Comment

Your email address will not be published. Required fields are marked *

Recipe rating 5 Stars 4 Stars 3 Stars 2 Stars 1 Star

“I achieved 10% of my short-term manifestation before my target date”
Before this program I knew a little about manifestations, but as I discovered during the program, I had a lot of limiting beliefs that kept me from fully embracing and accepting myself as a manifestor.
During this program I became more aware of what manifestation is and how powerful I am. I become more aware of my guides, of my highest self and that I can pull the best of my highest self into my present. Since this program I no longer wrestle with trying to convince myself that what I desire will happen. I know that it has happened, it is done and it is mine, here and now. I achieved 10% of my short-term manifestation before my target date, my eyesight has improved and I no longer need glasses for distance vision, only for reading, I gave myself a make-over as part of my commitment to my renewal and I began to de-clutter my space.
Trevor Buikies
Entrepreneur
Durban, South Africa
“My professional and personal life has seen significant positive changes”
Joining “The Art of Manifesting” was a life-changing decision for me. This is now the third time going through the quest and focusing on different areas of manifestation.
Regan is a powerful guide and she walks the talk.
This 28-day journey was a blend of practical techniques and profound energetical activations. I learned to visualize my goals clearly, expand my possibilities, and overcome the limitations holding me back from living a life i desire. The quest’s unique approach to identity hacking helped me align my inner self with my aspirations, making the manifestation process more effective and authentic.
The biggest takeaway for me was the acceleration of manifestation by bending time and tapping into the highest frequencies. The techniques taught in the quest enabled me to see results much faster than I expected. My professional and personal life has seen significant positive changes, and goals that once seemed unattainable are now within reach.
I’m beyond grateful for the wisdom and tools I’ve gained from this quest and Regan. It’s not just about manifesting; it’s about transforming your entire lifestyle. I highly recommend “The Art of Manifesting” to anyone looking to turn their dreams into reality.
Till Infinity
D
Dijana Llugolli
Coach
Stockholm, Sweden
“This course and listening to Regan’s podcasts gave me the tools to acknowledge my blocks and mindsets around drinking”
I have so enjoyed this journey with Regan, I am a new person as a result of this quest. I now have new beliefs & mindsets that I keep working on daily, hourly. A kinder and more compassionate version of me has emerged over this journey, and I love her!
This quest has resulted in me finding the lost me, the me that has been hidden under the voices of doubt, fear or just lack of awareness that I get to run my life not the other voices in my head or family and people around me. When we wire ourselves to the future version of us, then we make different choices and we are already a different person!
Thank you Regan, thank you Mindvalley, thank you tribe!!!! ❤❤, I love you all and wish you a magical Christmas and hope our paths may cross one day at Mindvalley events.
Rachael Courtenay
Orthopedic Physical Therapist
Royal Tunbridge Wells, United Kingdom
“My family’s net income unexpectedly increased while I was taking the quest”
Before taking this Quest I believed that the prerequisites of success were hard work, long hours, timing and a degree of luck; “1% inspiration and 99% perspiration” was my mantra. Trying to achieve success with this mindset was exhausting, frustrating and unsustainable.


I then discovered The Art of Manifesting … and was blown away.


The foundational teaching of focusing on your inner world to achieve has been transformative in the way I live my life. I now know that cultivating the feeling of already being in possession of that which you want, accelerates the manifestation of what you desire.


My family’s net income unexpectedly increased while I was taking the quest, and have discovered a path to manifest greater abundance in the year to come. But perhaps the biggest shift I experienced during this quest now knowing that I am worthy and deserving of abundance. Regan, I am eternally grateful to you, thank you :-)
Rahim Kassam
Financial Risk Analyst
Toronto, Canada
“Now, my manifestation is showing up right before my eyes in ways I hadn’t even considered”
Before this program, I believed somewhat in manifestation but never knew how to do it, or if it was real, and the little bit I did know ended up being completely wrong! This Quest has not only taught me how to manifest and put me on the path to doing it the right way, but I was actually able to manifest what I had set at the beginning.
I never thought it would actually come true, but I committed myself to the process and gave it 100% every day. And now, my manifestation is showing up right before my eyes in ways I hadn’t even considered. It’s truly blowing my mind.
I had a financial goal for the end of the Quest, and different opportunities for selling my artwork started coming up, and the deals are coming out almost to the exact number I had set.
Not only that, but I have truly transformed into a better version of myself in these short weeks, more than I had in the last few years, that my spouse has even noticed.
I’m so excited for what’s to come next and so grateful for this program. Thank you.
Hannah McGuire Silva
Artist
Olney, United States
“I have written a 50,000-word book, that is now in design”
I joined Mindvalley on New Year’s 2023. I am excited to share how life has significantly changed in the first 90 days of the year. Beginning with the Silva Method, I envisioned and transformed a dysfunctional personal relationship, into a loving, caring separation, allowing me the peace and serenity to follow my path, and my partner to choose his. In February while on the Art of Manifesting Quest I listed my intent to have a book written by May 2023, and have a speaking engagement booked by December 2023.
I have written a 50,000-word book, that is now in design, and a journal for Women seeking a deeper connection with themselves, also in design. Both will be uploaded via KDP Amazon self-publishing by May 1st.
I have booked a speaking engagement for May with the intent of having published books with me for sale.
Most importantly – this morning I changed my profile from ‘Document writer’ to ‘Author.’
Gratitude abounds!!!
Sharr L
Author
Kelowna, Canada